Home : Workshop : Woodwork :
 I've been using Keku connectors to scribe/mount most of my cabinet trim (including toe-kicks) for a while now. The only situation where it is not ideal is when the trim has to be flush with the inside edge of an open box. Because it's not a continuous rigid mount, a bit of overlay/reveal is a good idea.
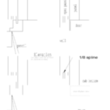
At the top of the image the scribe strip is held for marking. Two different methods, both using a 12.5mm (1/2") offset and marking block, are shown. After marking the scribe strip it is (re)mounted 12.5mm closer to the wall/ceiling, cut to the marked line, then snapped into place (middle of the image)... See also: Keku Scribe Tool
 In the past I've used splines and slots. While it works, it's a lot more time consuming and finicky. The trim typically has to be rough cut fairly close before you can use this method because the offset is only 1/4".
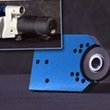
 I haven't tried it, but the QuickScribe is an Interesting router base attachment that provides a 1" offset for interior and exterior scribing of cabinet fillers, countertops, etc. The QuickScribe can be used in tandem with their EuroScriber (scribe strip clamp) to scribe cabinet trim. While I love the idea (I've put a lot of thought into fixed offset scribing), a lot of my work gets installed where folks are living and the dust would be unacceptable (I power/hand plane my scribes outside).
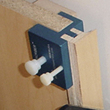
 Thinking about the EuroScriber and doing some digging, I found an image (source) that shows the trim profile. A profile is needed to both hold the trim in place and to minimize the surface area that gets routed. A tongue cutting bit might do the trick. There's no decent way to mount that profile short of using a rabbited piece mounted to the box (as in the image). The EuroScriber is limited to holding trim that will fit between the cabinet and the wall, it won't work if you want the trim to overlay the box. You also cannot use it for scribing wall returns (bottom of uppers)... I've just run across what appears to be their patent application. It includes these drawings of the scribe installed and clamped (source).
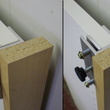
 I've come up with something similar for scribes mounted with Keku connectors. The holder is screwed to the scribe strip using holes that will be used to mount the Keku connectors. It can be used for scribing recessed (image left, holes 15mm from the edge of the scribe) and overlay (image right, 15 + overlay, e.g. 23mm hole spacing for 8mm overlay) scribes. The scribe strip is held 1" out and you can run a 1" thick block along the wall to mark the scribe. It's probably not sturdy enough to use with a QuickScribe
I've been noticing people talking about using compasses, jig saws and belt sanders for marking/cutting "straight" scribes. A compass and jigsaw are only needed when profiles, e.g. baseboard, are involved. Small pieces of plywood, 1-2" wide and 2-3" long, and a pencil are easier and more reliable for "straight" scribes. Whatever the situation, pick an offset that matches a standard material thickness. The offset in the above three methods are 1/2, 1/4 and 1" respectively. Plastic pencils that you can slide flat on the wall are good for scribing stuff that fits pretty well to start with.
I cut all my "straight" scribes with a power plane. A power plane can be used for everything, from hogging off a lot of material to final fitting. Jim Chestnut (the Clam Clamp man) has a bunch of finish carpentry related videos on his site and one is about the little (red or blue) Makita Power Planes (20MB WMV). His video shows how much of a concave cut you can make with these and how much meat they can take off (with a slight modification). Power planes are probably the most dangerous handheld power tool out there so be careful. While you can get pretty darn close with the power plane, I use a low angle block plane for cleaning up curves and for minor tweaking and fitting. Using Keku clips for mouting narrow trim makes power planing narrow scribes easy and safe because the trim can be clipped to a board clamped in a WorkMate. Before I started using Keku clips I used a table saw and a hand plane to cut/fit narrow scribes.
Scribing Cabinet Trim
 I've been using Keku connectors to scribe/mount most of my cabinet trim (including toe-kicks) for a while now. The only situation where it is not ideal is when the trim has to be flush with the inside edge of an open box. Because it's not a continuous rigid mount, a bit of overlay/reveal is a good idea.
 At the top of the image the scribe strip is held for marking. Two different methods, both using a 12.5mm (1/2") offset and marking block, are shown. After marking the scribe strip it is (re)mounted 12.5mm closer to the wall/ceiling, cut to the marked line, then snapped into place (middle of the image)... See also: Keku Scribe Tool
 In the past I've used splines and slots. While it works, it's a lot more time consuming and finicky. The trim typically has to be rough cut fairly close before you can use this method because the offset is only 1/4".
 I haven't tried it, but the QuickScribe is an Interesting router base attachment that provides a 1" offset for interior and exterior scribing of cabinet fillers, countertops, etc. The QuickScribe can be used in tandem with their EuroScriber (scribe strip clamp) to scribe cabinet trim. While I love the idea (I've put a lot of thought into fixed offset scribing), a lot of my work gets installed where folks are living and the dust would be unacceptable (I power/hand plane my scribes outside).
  Thinking about the EuroScriber and doing some digging, I found an image (source) that shows the trim profile. A profile is needed to both hold the trim in place and to minimize the surface area that gets routed. A tongue cutting bit might do the trick. There's no decent way to mount that profile short of using a rabbited piece mounted to the box (as in the image). The EuroScriber is limited to holding trim that will fit between the cabinet and the wall, it won't work if you want the trim to overlay the box. You also cannot use it for scribing wall returns (bottom of uppers)... I've just run across what appears to be their patent application. It includes these drawings of the scribe installed and clamped (source).
 I've come up with something similar for scribes mounted with Keku connectors. The holder is screwed to the scribe strip using holes that will be used to mount the Keku connectors. It can be used for scribing recessed (image left, holes 15mm from the edge of the scribe) and overlay (image right, 15 + overlay, e.g. 23mm hole spacing for 8mm overlay) scribes. The scribe strip is held 1" out and you can run a 1" thick block along the wall to mark the scribe. It's probably not sturdy enough to use with a QuickScribe
I've been noticing people talking about using compasses, jig saws and belt sanders for marking/cutting "straight" scribes. A compass and jigsaw are only needed when profiles, e.g. baseboard, are involved. Small pieces of plywood, 1-2" wide and 2-3" long, and a pencil are easier and more reliable for "straight" scribes. Whatever the situation, pick an offset that matches a standard material thickness. The offset in the above three methods are 1/2, 1/4 and 1" respectively. Plastic pencils that you can slide flat on the wall are good for scribing stuff that fits pretty well to start with.
I cut all my "straight" scribes with a power plane. A power plane can be used for everything, from hogging off a lot of material to final fitting. Jim Chestnut (the Clam Clamp man) has a bunch of finish carpentry related videos on his site and one is about the little (red or blue) Makita Power Planes (20MB WMV). His video shows how much of a concave cut you can make with these and how much meat they can take off (with a slight modification). Power planes are probably the most dangerous handheld power tool out there so be careful. While you can get pretty darn close with the power plane, I use a low angle block plane for cleaning up curves and for minor tweaking and fitting. Using Keku clips for mouting narrow trim makes power planing narrow scribes easy and safe because the trim can be clipped to a board clamped in a WorkMate. Before I started using Keku clips I used a table saw and a hand plane to cut/fit narrow scribes.
