Glue-up fence
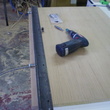
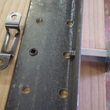
 I do a lot of built up edges on applied ends, shelves, counters and toe-kicks. I came up with the glue-up fence to speed up/simplify the task. The glue-up fence is made from 2x2" angle iron. It has removable stops on the front edge to space the fence from the edge of the panel and holes in the face to mount the fence. The holes were designed to work with a Vix-bit and screws as well as 5mm pins.
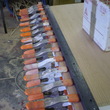
 Once the fence is screwed in place the stops are removed. While you could use clamps to hold the fence in place (and that's what I do for shelves where I don't want holes), its easier to do the glue-up with nothing in the way at the front of the fence.
  Since I was putting holes in the panels I decided to put them someplace useful. I decided on two rows of holes spaced 32mm apart. The primary row is 37mm from the front edge of the fence to match 32mm system holes. I use the system row to index the Modeez brackets that I use to mount my applied ends. The second row is 9.5mm (22.5 would also be useful) from the front of the fence and is used to mount the Modeez bracket in a horizontal position for applied ends that butt to the ceiling and toe-kick trim.
 The fence stops set the fence back 21mm (19mm faces + 2mm bumpers) from the edge. If the applied end is made side panel depth plus 44mm (21 x 2), the fence can be used to drill the front and back Modeez mounting holes. After the panel is glued the banding thickness is ripped off the front edge (clean edge plus edgebanding = 21mm deep buildup). I use 6mm applied backs which leaves 15mm (21 - 6) for scribing the back edge to the wall. That's a bit generous but it simplifies things. You could also make a 1/4" panel sized template with 1/4" holes (for Vix-bit) where the Modeez mounting holes need to be.
Comments [ new ]
- Commercial 32 mm systems
- Posted by Marko Djordjic on Thursday, 19-Sep-2024
Dave, do you have any recommendations, or have you done some research on commercial 32 mm system holes boring guide rails such as the ones produced by Festool or Bosch? It would be interesting to make a section on the web-site about that. Eg. [link]
[ reply | link ] to this. Go to [ topic | top ]
Which option s they provide, system registration, shifted registration, etc.
- Re: Commercial 32 mm systems
- Posted by Dave L on Friday, 20-Sep-2024
There is a Commercial Drill Jigs page but it's quite old and doesn't include Festool or Bosch... An old comment of mine from another discussion: "The Festool LR32 stop looks easy to set, but the users only options are 9.5, 16 and 32mm start holes".
[ reply | link ] to this. Go to [ parent | topic | top ]
- Re: Commercial 32 mm systems
- Posted by Mark on Saturday, 23-Aug-2025
For anyone else who, like me, may have been interested, the LR32 stop does offer the option of a 25.5 start (or a 57.5 start like in Dave's railed inset diagram on the styles page) by putting the unmarked side "up and out". The 9.5 will be facing down and out from the rail.
[ reply | link ] to this. Go to [ parent | OP | topic | top ]
