
Home : Workshop :
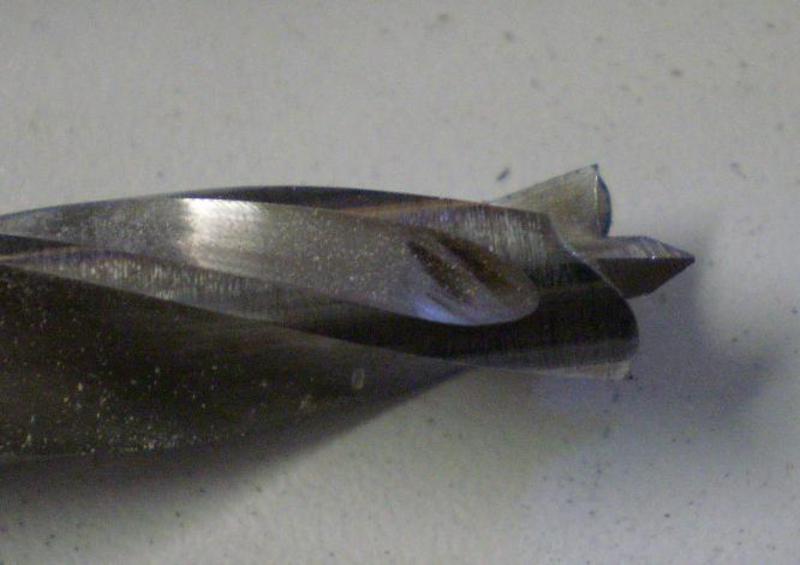
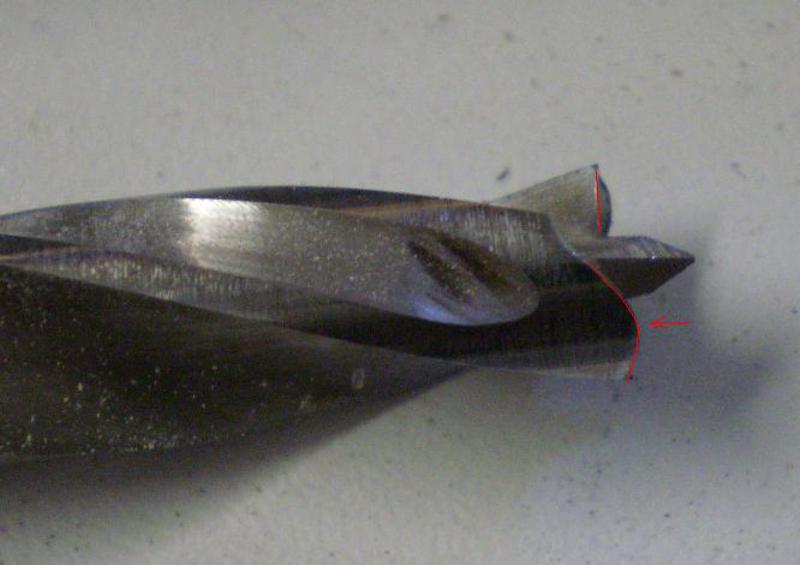
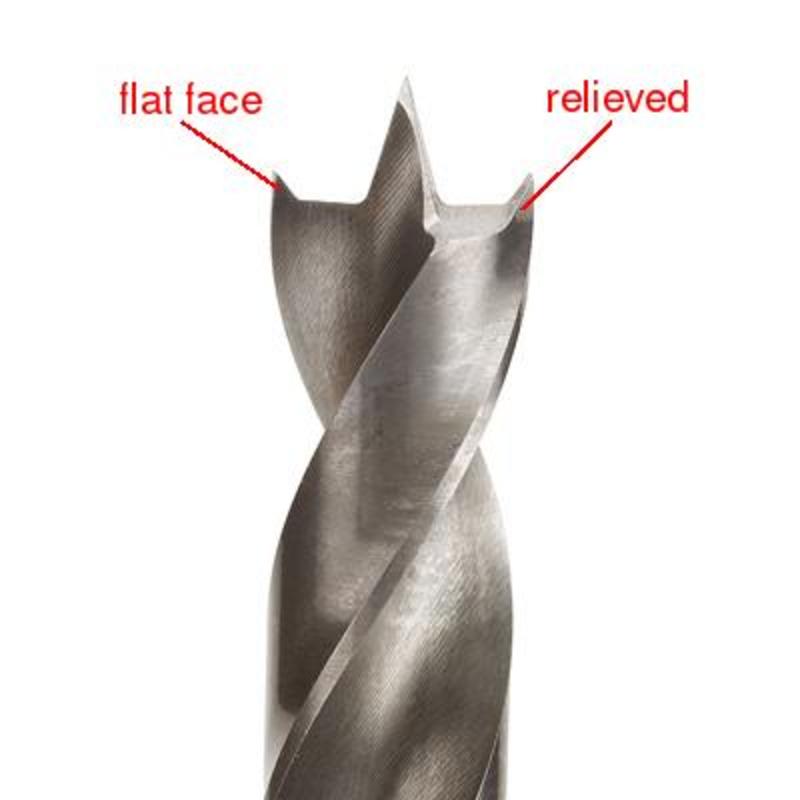
 I'm amazed how many brad point bits seem to be standard drill bits ground with a brad point. Leonard Lee uses the labels "utility" and "spurred" to classify two types of brad point bits. Quality brad point bits have curved edge outlining spurs that you cannot get by grinding a standard drill bit. The curved wedge shape has a knife edge that scores the perimeter of the hole before any material is removed. While utility bit designs can minimize grain tearing, curved scoring spurs eliminate it completely (viewed from another angle, with highlighted edges).
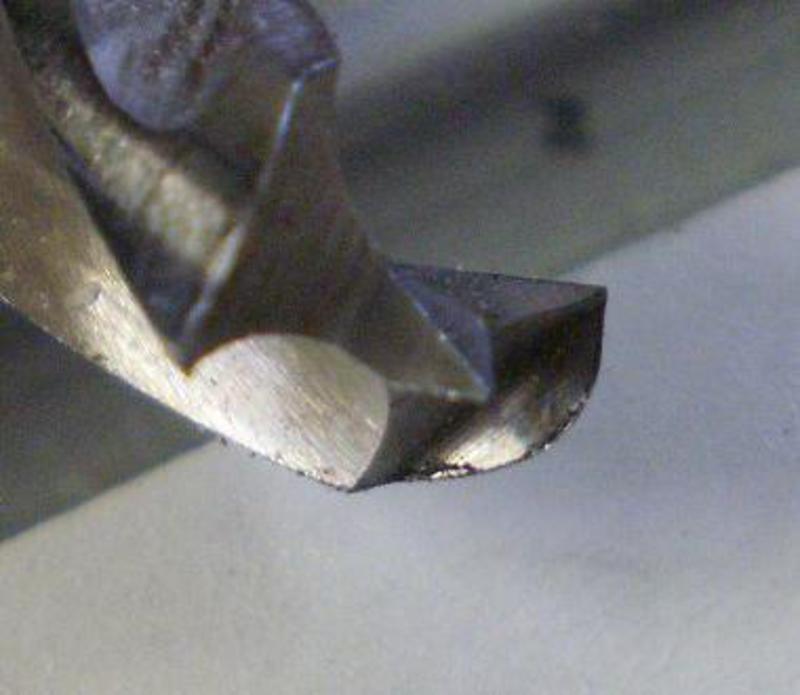
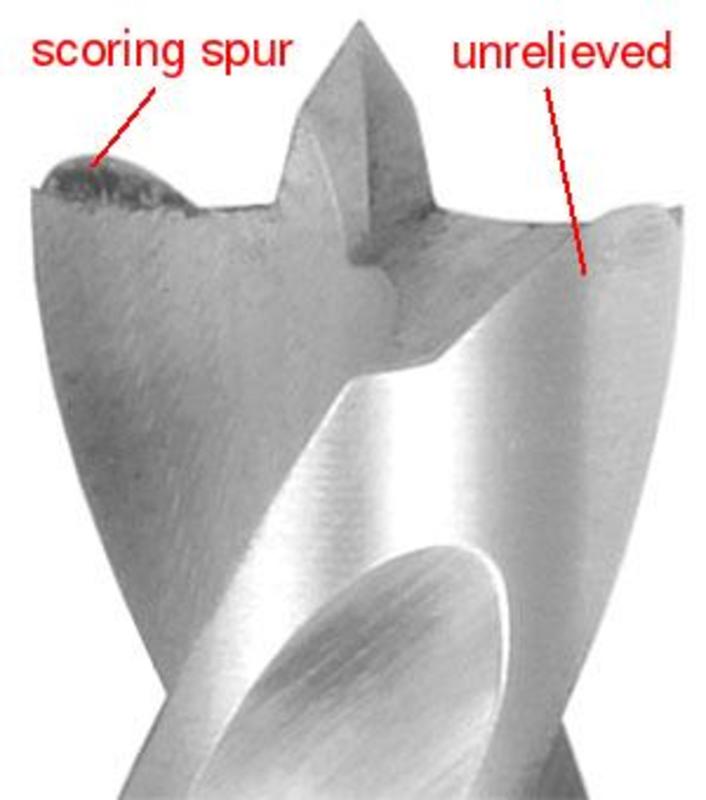
Bits with curved edge outlining spurs have unrelieved lands* (the outer face of the spiral), or widening margins, near the tip of the bit. The unrelieved area provides the space/material needed to to grind a curved leading edge (without it any "spurs" will be flat faced). The pictured bit also has whats called double margin lands, the lands are relieved down the center instead having everything behind the leading edge relieved (single margin). The added friction is minimal and inconsequential when drilling wood (VS metal). The benefits are cleaner and more precise holes, as well as better wear resistance when using drill bushings... more
[ page | top ]
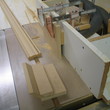
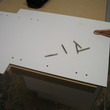
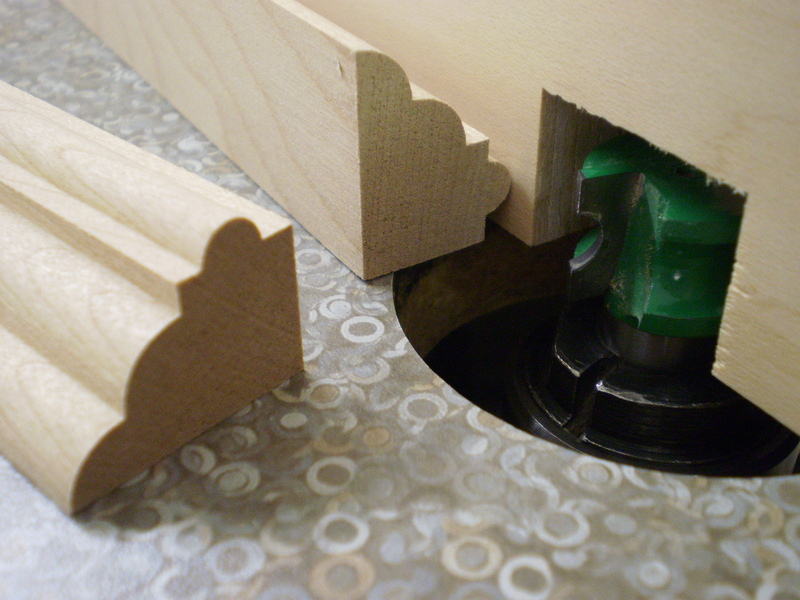
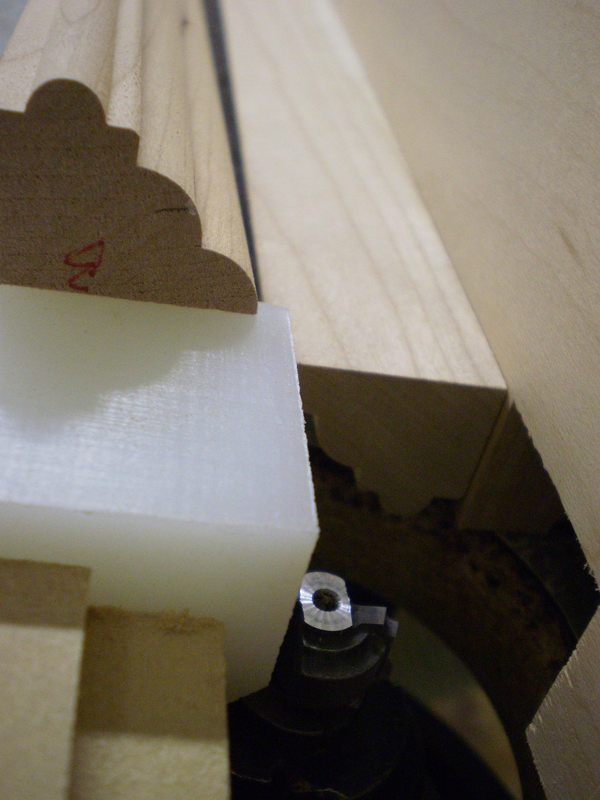
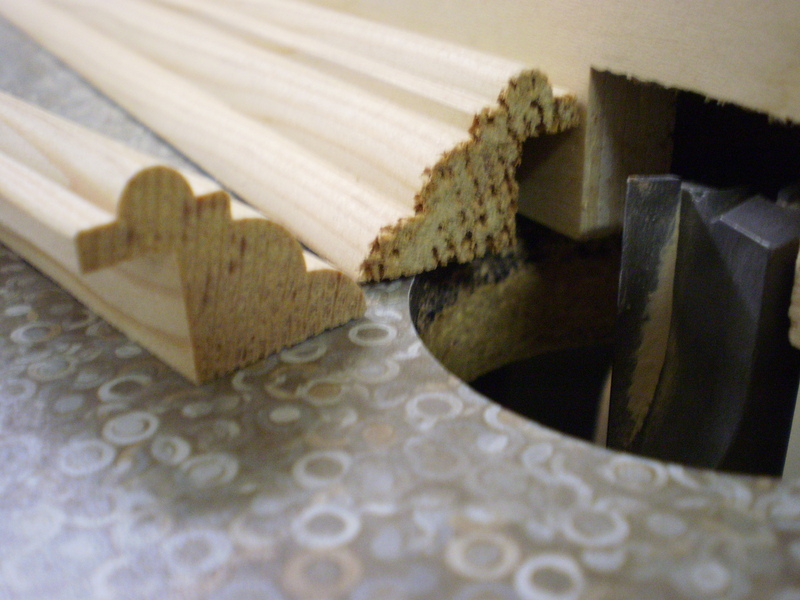
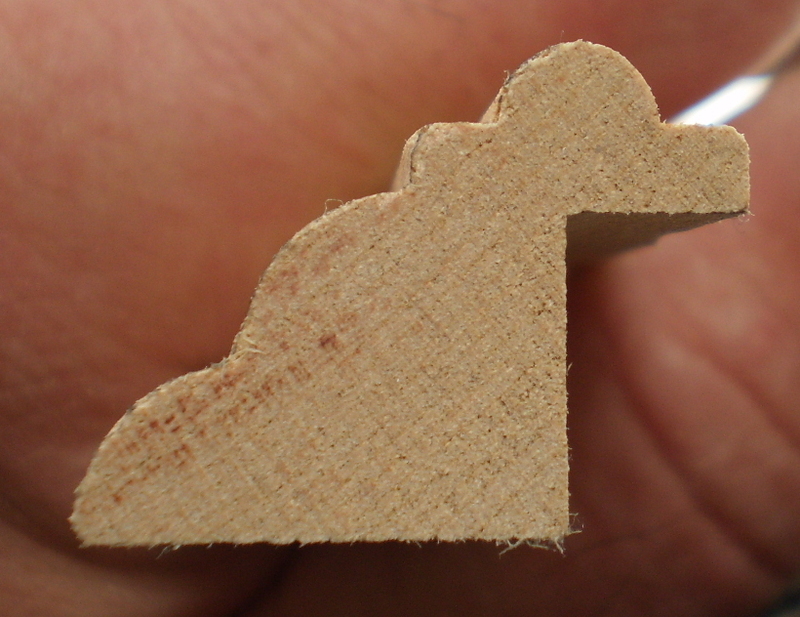
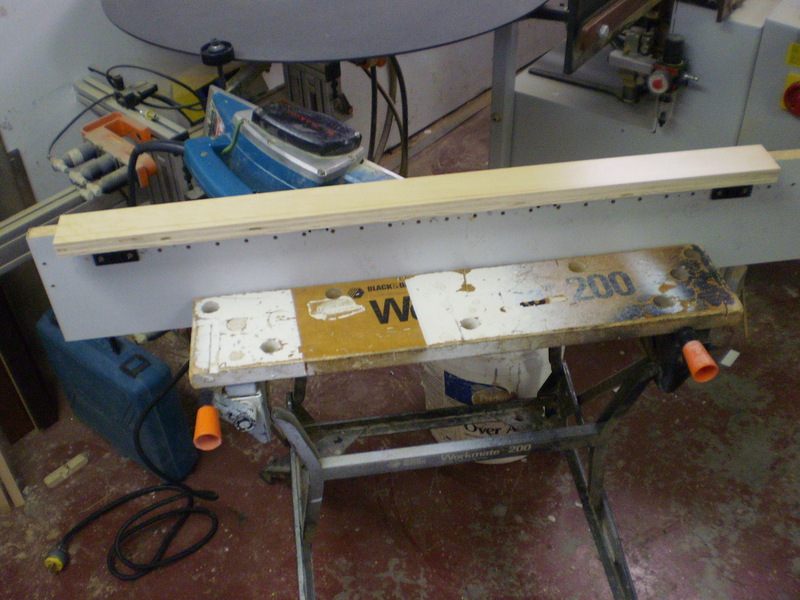
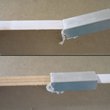
 I try to stick to stock moldings, but had a small job where I needed to match some old applied door molding. My solution was four different cutters and five passes. The image is the first pass. Click the image and then next to see the rest.
[ comment | link | top ]
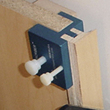
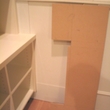
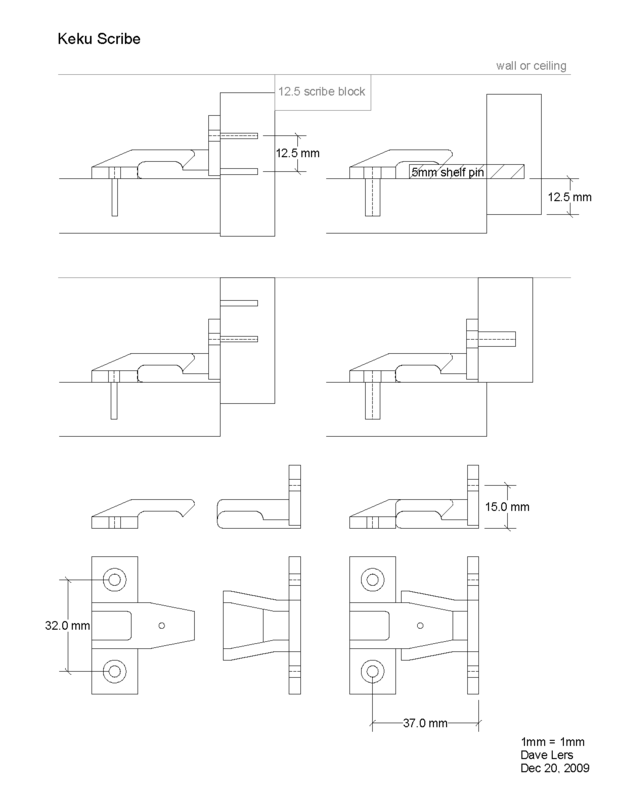
 I've been using Keku connectors to scribe/mount most of my cabinet trim (including toe-kicks) for a while now. The only situation where it is not ideal is when the trim has to be flush with the inside edge of an open box. Because it's not a continuous rigid mount, a bit of overlay/reveal is a good idea.
At the top of the image the scribe strip is held for marking. Two different methods, both using a 12.5mm (1/2") offset and marking block, are shown. After marking the scribe strip it is (re)mounted 12.5mm closer to the wall/ceiling, cut to the marked line, then snapped into place (middle of the image)... See also: Keku Scribe Tool
 In the past I've used splines and slots. While it works, it's a lot more time consuming and finicky. The trim typically has to be rough cut fairly close before you can use this method because the offset is only 1/4".
 I haven't tried it, but the QuickScribe is an Interesting router base attachment that provides a 1" offset for interior and exterior scribing of cabinet fillers, countertops, etc. The QuickScribe can be used in tandem with their EuroScriber (scribe strip clamp) to scribe cabinet trim. While I love the idea (I've put a lot of thought into fixed offset scribing), a lot of my work gets installed where folks are living and the dust would be unacceptable (I power/hand plane my scribes outside).
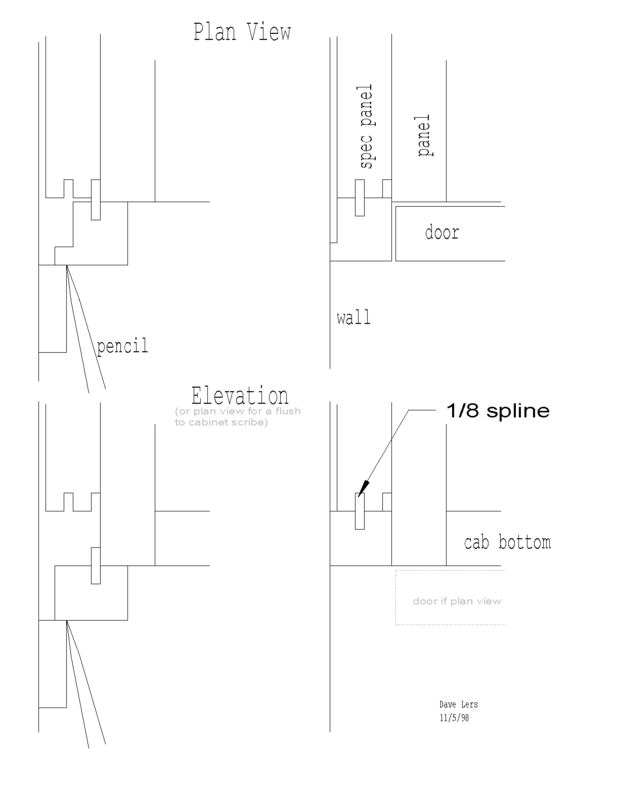
 Thinking about the EuroScriber and doing some digging, I found an image (source) that shows the trim profile. A profile is needed to both hold the trim in place and to minimize the surface area that gets routed. A tongue cutting bit might do the trick. There's no decent way to mount that profile short of using a rabbited piece mounted to the box (as in the image). The EuroScriber is limited to holding trim that will fit between the cabinet and the wall, it won't work if you want the trim to overlay the box. You also cannot use it for scribing wall returns (bottom of uppers)... I've just run across what appears to be their patent application. It includes these drawings of the scribe installed and clamped (source).
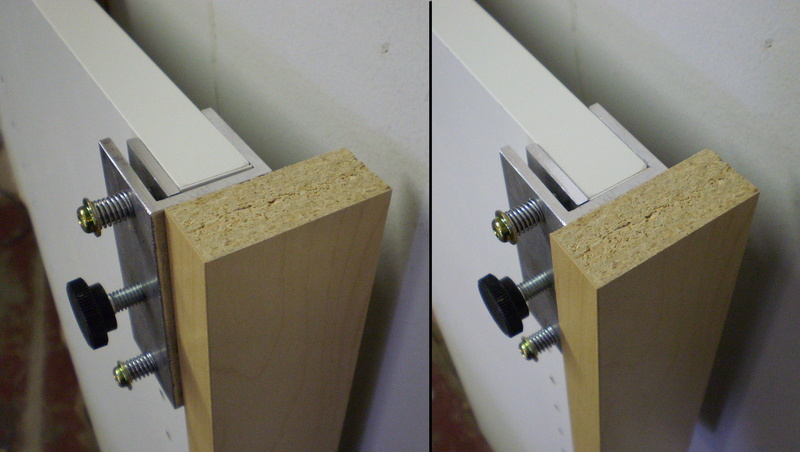
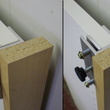 I've come up with something similar for scribes mounted with Keku connectors. The holder is screwed to the scribe strip using holes that will be used to mount the Keku connectors. It can be used for scribing recessed (image left, holes 15mm from the edge of the scribe) and overlay (image right, 15 + overlay, e.g. 23mm hole spacing for 8mm overlay) scribes. The scribe strip is held 1" out and you can run a 1" thick block along the wall to mark the scribe. It's probably not sturdy enough to use with a QuickScribe
I've been noticing people talking about using compasses, jig saws and belt sanders for marking/cutting "straight" scribes. A compass and jigsaw are only needed when profiles, e.g. baseboard, are involved. Small pieces of plywood, 1-2" wide and 2-3" long, and a pencil are easier and more reliable for "straight" scribes. Whatever the situation, pick an offset that matches a standard material thickness. The offset in the above three methods are 1/2, 1/4 and 1" respectively. Plastic pencils that you can slide flat on the wall are good for scribing stuff that fits pretty well to start with.
I cut all my "straight" scribes with a power plane. A power plane can be used for everything, from hogging off a lot of material to final fitting. Jim Chestnut (the Clam Clamp man) has a bunch of finish carpentry related videos on his site and one is about the little (red or blue) Makita Power Planes (20MB WMV). His video shows how much of a concave cut you can make with these and how much meat they can take off (with a slight modification). Power planes are probably the most dangerous handheld power tool out there so be careful. While you can get pretty darn close with the power plane, I use a low angle block plane for cleaning up curves and for minor tweaking and fitting. Using Keku clips for mouting narrow trim makes power planing narrow scribes easy and safe because the trim can be clipped to a board clamped in a WorkMate. Before I started using Keku clips I used a table saw and a hand plane to cut/fit narrow scribes.
[ comment | link | top ]
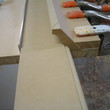
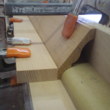
 Two piece, 2 - 1/4", top mounted crown that can have whatever reveal you want, e.g. 1/4" reveal to cabinet (the mock-up in the foreground) or doors. Its made with a Grizzly bit in a table router. The white fence was originally built for routing lock miters but I use it for everything. The clamped on MDF provides a tunnel that is the same size as my stock (5/8 x ~2 - 5/8", wide enough for a full miter on the bottom). Once the stock is routered, it needs two passes (top edge first, leave a hair of flat) on the tablesaw (38deg is standard, I needed 40, the saw scale or router bit are off... bit is 40).
 The base piece also gets a 38deg. miter and I use a jig (image) to glue it to the crown. The key part of the jig is a round-over profile to match the cove in the crown. You could set it up anyway you want. For me the aluminum stop and loose round-over worked fine. If you tilt the spring clamps they can provide both down and forward pressure. With MDF I had almost perfect alignment on the bottom edge, a hard block sander evened things up quite nicely. There's also an image showing the full glue-up.
The next thing to try is lipped crown that will work with half-overlay upper cabinets. This will require at least 3/4" material which should be able to provide a slight reveal. I ran a 3/4" piece with the above, but cut the base to 21mm, i.e. flush to door face (19 door + 2 bumper, no reveal), without thinking it through. The jig would have to be setup with an 8mm strip underneath the base piece.
 ...I took a slightly diferent approach when extending the base of stock 3-1/4" crown. I made an L from some leftover Maple PB (I spaced out on the 3/4" loss, so the base of the L is 3/4" shorter than I wanted). The cove in the crown had a 3/4" radius so the only tricky part was ripping the 3/4" radiused MDF stop to the correct width. The crown was pretty bowed ao I used a lot of clamps. Using spring clamps, I veneered the bottom to make the seam go away.
[ page | comments (1) - Sunday, 25-Jun-2023 | top ]
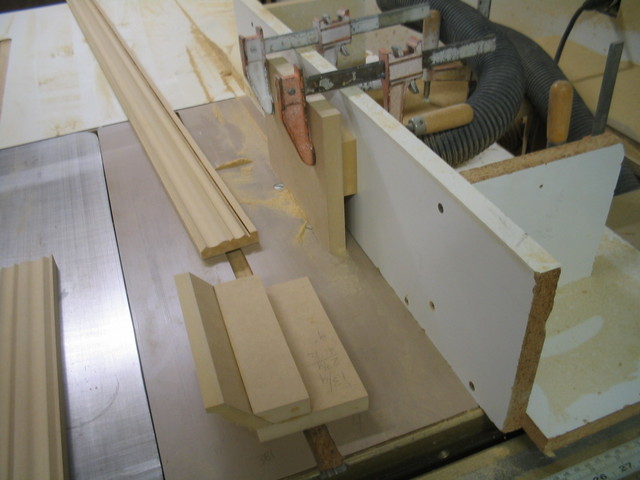
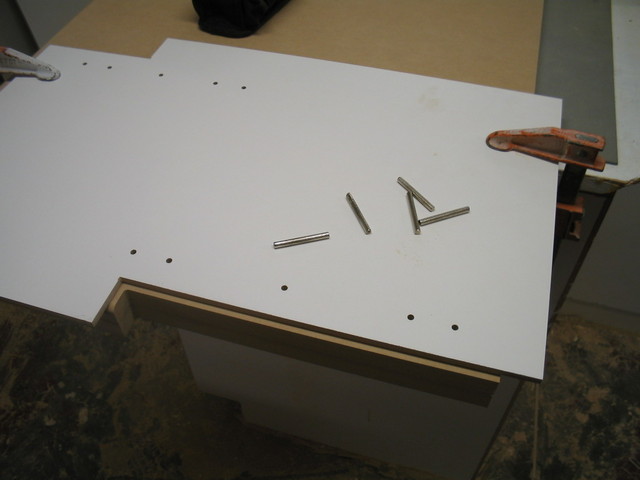
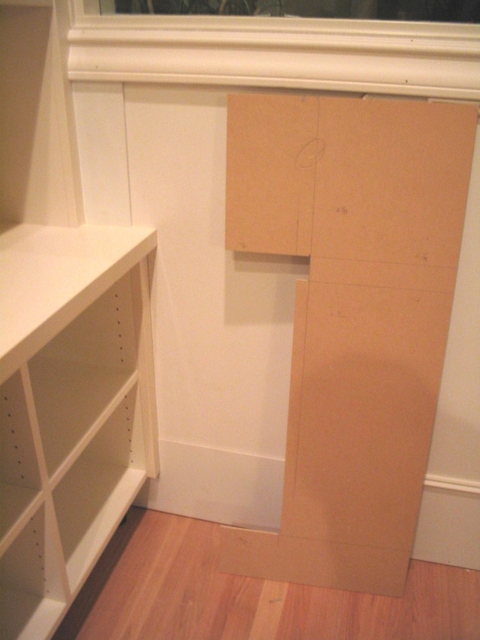
 I use router templates a lot. I'm trying to clean out an image directory so this isn't the greatest example. This one was used to route the coutertop to allow an applied end to pass down to a counter at a lower level (image), at the end of the lower counter where it dies into a mantle and to provide a vent to the top of the cabinet from a component cabinet. The holes and pins align the template to the construction holes used to mount the bookshelf end-panels to the counter.
 I used this one to scribe wainscot to a cabinet. There's also a closeup of the resulting fit (before caulk/paint). I took the necessary measurements, enlarged them by 3/16" to work with a 1/4" bit and 5/8" guide, marked a scrap of 1/4" MDF and cut it on the table saw. Due to the sloping floor, I had to tweak the template from 90 degrees and take a second pass.
[ comment | link | top ]
Woodwork
Quality Brad Point Bits
 I'm amazed how many brad point bits seem to be standard drill bits ground with a brad point. Leonard Lee uses the labels "utility" and "spurred" to classify two types of brad point bits. Quality brad point bits have curved edge outlining spurs that you cannot get by grinding a standard drill bit. The curved wedge shape has a knife edge that scores the perimeter of the hole before any material is removed. While utility bit designs can minimize grain tearing, curved scoring spurs eliminate it completely (viewed from another angle, with highlighted edges).
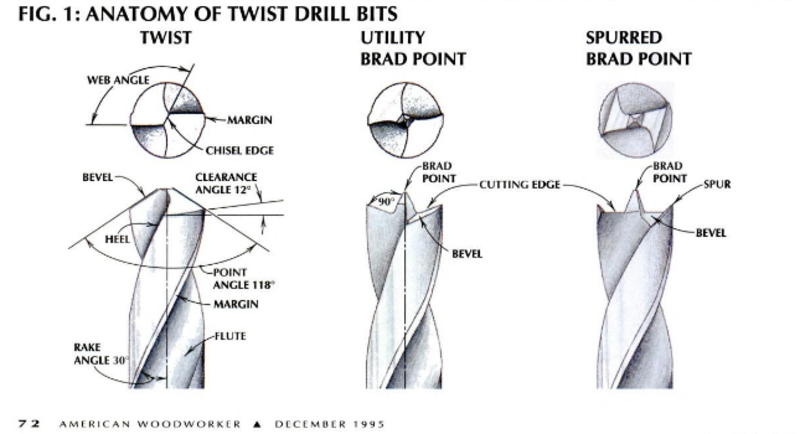
Bits with curved edge outlining spurs have unrelieved lands* (the outer face of the spiral), or widening margins, near the tip of the bit. The unrelieved area provides the space/material needed to to grind a curved leading edge (without it any "spurs" will be flat faced). The pictured bit also has whats called double margin lands, the lands are relieved down the center instead having everything behind the leading edge relieved (single margin). The added friction is minimal and inconsequential when drilling wood (VS metal). The benefits are cleaner and more precise holes, as well as better wear resistance when using drill bushings... more
[ page | top ]
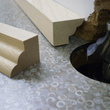
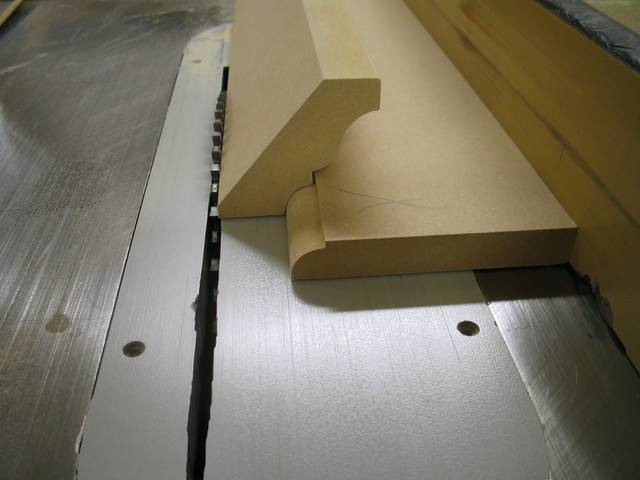
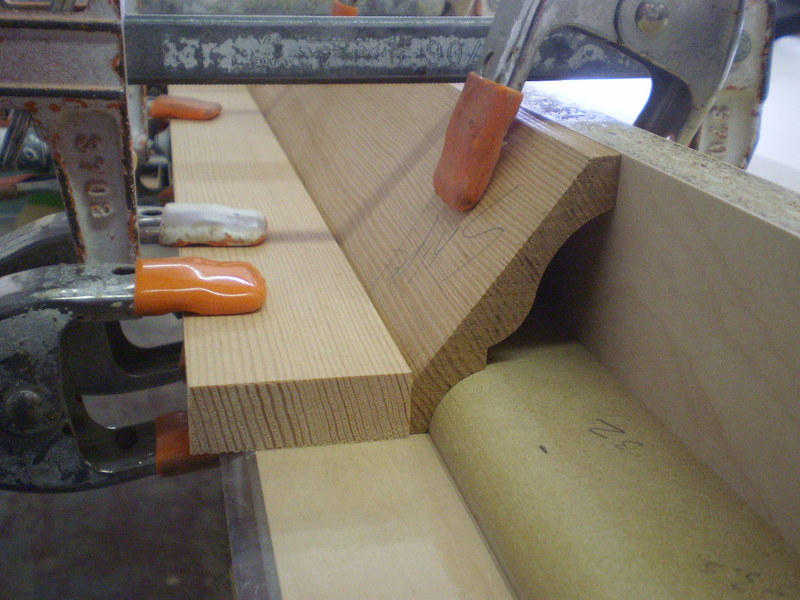
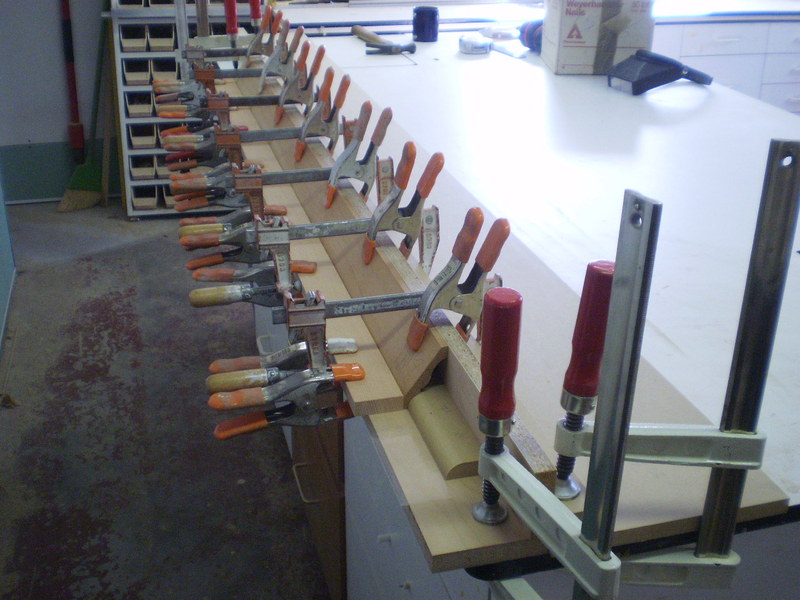
Custom Molding
 I try to stick to stock moldings, but had a small job where I needed to match some old applied door molding. My solution was four different cutters and five passes. The image is the first pass. Click the image and then next to see the rest.
[ comment | link | top ]
Scribing Cabinet Trim
 I've been using Keku connectors to scribe/mount most of my cabinet trim (including toe-kicks) for a while now. The only situation where it is not ideal is when the trim has to be flush with the inside edge of an open box. Because it's not a continuous rigid mount, a bit of overlay/reveal is a good idea.
 At the top of the image the scribe strip is held for marking. Two different methods, both using a 12.5mm (1/2") offset and marking block, are shown. After marking the scribe strip it is (re)mounted 12.5mm closer to the wall/ceiling, cut to the marked line, then snapped into place (middle of the image)... See also: Keku Scribe Tool
 In the past I've used splines and slots. While it works, it's a lot more time consuming and finicky. The trim typically has to be rough cut fairly close before you can use this method because the offset is only 1/4".
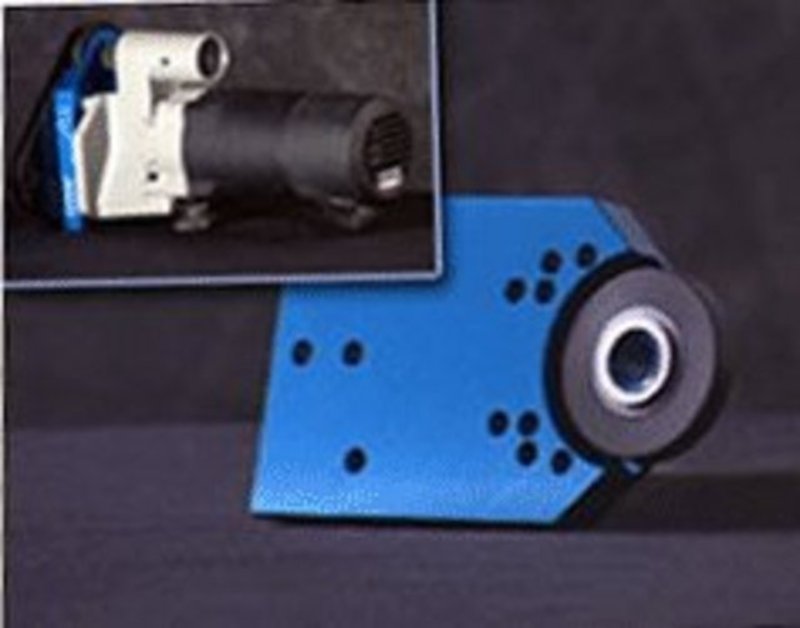 I haven't tried it, but the QuickScribe is an Interesting router base attachment that provides a 1" offset for interior and exterior scribing of cabinet fillers, countertops, etc. The QuickScribe can be used in tandem with their EuroScriber (scribe strip clamp) to scribe cabinet trim. While I love the idea (I've put a lot of thought into fixed offset scribing), a lot of my work gets installed where folks are living and the dust would be unacceptable (I power/hand plane my scribes outside).
  Thinking about the EuroScriber and doing some digging, I found an image (source) that shows the trim profile. A profile is needed to both hold the trim in place and to minimize the surface area that gets routed. A tongue cutting bit might do the trick. There's no decent way to mount that profile short of using a rabbited piece mounted to the box (as in the image). The EuroScriber is limited to holding trim that will fit between the cabinet and the wall, it won't work if you want the trim to overlay the box. You also cannot use it for scribing wall returns (bottom of uppers)... I've just run across what appears to be their patent application. It includes these drawings of the scribe installed and clamped (source).
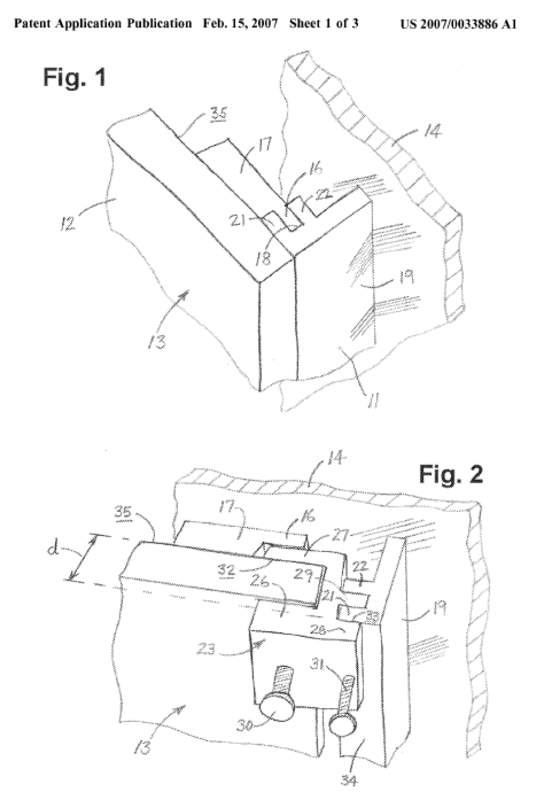
 I've come up with something similar for scribes mounted with Keku connectors. The holder is screwed to the scribe strip using holes that will be used to mount the Keku connectors. It can be used for scribing recessed (image left, holes 15mm from the edge of the scribe) and overlay (image right, 15 + overlay, e.g. 23mm hole spacing for 8mm overlay) scribes. The scribe strip is held 1" out and you can run a 1" thick block along the wall to mark the scribe. It's probably not sturdy enough to use with a QuickScribe
I've been noticing people talking about using compasses, jig saws and belt sanders for marking/cutting "straight" scribes. A compass and jigsaw are only needed when profiles, e.g. baseboard, are involved. Small pieces of plywood, 1-2" wide and 2-3" long, and a pencil are easier and more reliable for "straight" scribes. Whatever the situation, pick an offset that matches a standard material thickness. The offset in the above three methods are 1/2, 1/4 and 1" respectively. Plastic pencils that you can slide flat on the wall are good for scribing stuff that fits pretty well to start with.
I cut all my "straight" scribes with a power plane. A power plane can be used for everything, from hogging off a lot of material to final fitting. Jim Chestnut (the Clam Clamp man) has a bunch of finish carpentry related videos on his site and one is about the little (red or blue) Makita Power Planes (20MB WMV). His video shows how much of a concave cut you can make with these and how much meat they can take off (with a slight modification). Power planes are probably the most dangerous handheld power tool out there so be careful. While you can get pretty darn close with the power plane, I use a low angle block plane for cleaning up curves and for minor tweaking and fitting. Using Keku clips for mouting narrow trim makes power planing narrow scribes easy and safe because the trim can be clipped to a board clamped in a WorkMate. Before I started using Keku clips I used a table saw and a hand plane to cut/fit narrow scribes.
[ comment | link | top ]
Custom Crown
 Two piece, 2 - 1/4", top mounted crown that can have whatever reveal you want, e.g. 1/4" reveal to cabinet (the mock-up in the foreground) or doors. Its made with a Grizzly bit in a table router. The white fence was originally built for routing lock miters but I use it for everything. The clamped on MDF provides a tunnel that is the same size as my stock (5/8 x ~2 - 5/8", wide enough for a full miter on the bottom). Once the stock is routered, it needs two passes (top edge first, leave a hair of flat) on the tablesaw (38deg is standard, I needed 40, the saw scale or router bit are off... bit is 40).
 The base piece also gets a 38deg. miter and I use a jig (image) to glue it to the crown. The key part of the jig is a round-over profile to match the cove in the crown. You could set it up anyway you want. For me the aluminum stop and loose round-over worked fine. If you tilt the spring clamps they can provide both down and forward pressure. With MDF I had almost perfect alignment on the bottom edge, a hard block sander evened things up quite nicely. There's also an image showing the full glue-up.
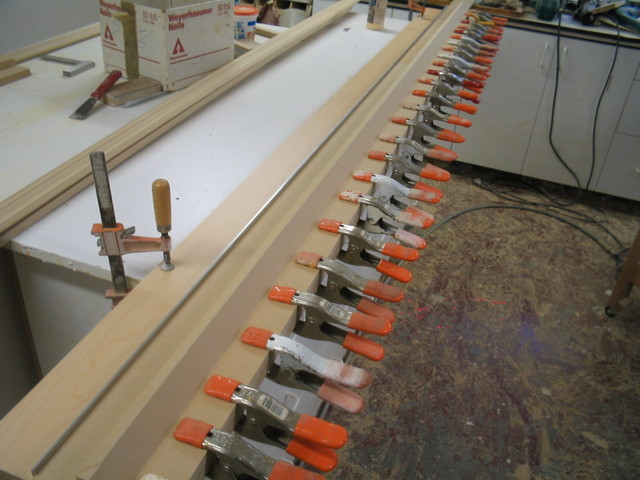
The next thing to try is lipped crown that will work with half-overlay upper cabinets. This will require at least 3/4" material which should be able to provide a slight reveal. I ran a 3/4" piece with the above, but cut the base to 21mm, i.e. flush to door face (19 door + 2 bumper, no reveal), without thinking it through. The jig would have to be setup with an 8mm strip underneath the base piece.
 ...I took a slightly diferent approach when extending the base of stock 3-1/4" crown. I made an L from some leftover Maple PB (I spaced out on the 3/4" loss, so the base of the L is 3/4" shorter than I wanted). The cove in the crown had a 3/4" radius so the only tricky part was ripping the 3/4" radiused MDF stop to the correct width. The crown was pretty bowed ao I used a lot of clamps. Using spring clamps, I veneered the bottom to make the seam go away.
[ page | comments (1) - Sunday, 25-Jun-2023 | top ]
MDF Edge Preperation
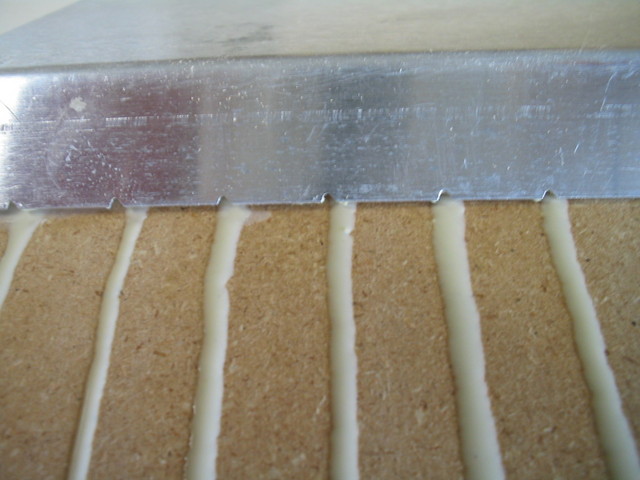
MDF provides an excellent surface for paint. MDF's one weakness is the porous cut edges. I've tried a lot of things in the past. Lacquer undercoater and tight grained wood edgebanding work reasonably well. Lacquer undercoater, while much better than quick dry oil based primer, leaves a rough edge that needs to be sanded. The process needs to be done twice to get an edge free of pores. Sanding and keeping the narrow surface flat and square isn't easy. I've never tried the often suggested glue size treatment, but I think it would similar to, and more time consuming than, primer. Edgebanding is less labor intensive, but the seam will telegraph sooner or later due to the ongoing expansion and contraction of dissimilar materials.
 I've found that lightweight glass micro-balloon based spackle is faster and better. While you can apply it with a spackle knife, its messy and slow. Custom applicators/scrapers are the only way this method will be faster. Applicators/scrapers are best made with thin stainless steel bent on a sheetmetal break. My preferred brand is Red Devils OneTime, Dap's Fast 'N Final is a bit thicker/drier and not as easy to use. The trick is to spread it so it gets pushed into the pores and then scrape it off as fast as you can. You want the surface to remain as clear as possible, i.e. no visible spackle. When it dries, a light sanding (220) is all that's needed. When you sand the edge you'll notice that the dust is white. While it doesn't look like it, the spackle fills the pores and seals the material. The spackled edge will take the primer just like the face.
Woodweb discussions on MDF prep:
Prepping MDF for Paint
Priming MDF Edges for Finishing
Sealing the Edges of MDF
The later has a comment that says "Don't make the mistake of building up a 1-1/2" MDF edge with two layers of 3/4" material and then lacquering it. The glue line will witness.". The only time I've had a glue line show is when the glue line was too thick. The only time that happened was when I used a wide (4-6"?) buildup strip. My standard buildup strip is less than 2" wide. Using a toothed glue spreader and plenty of spring clamps will make witnessing a non issue... I now use a fine tooth spreader for all glue-ups, including veneer.
[ comment | link | top ]
Router Templates
 I use router templates a lot. I'm trying to clean out an image directory so this isn't the greatest example. This one was used to route the coutertop to allow an applied end to pass down to a counter at a lower level (image), at the end of the lower counter where it dies into a mantle and to provide a vent to the top of the cabinet from a component cabinet. The holes and pins align the template to the construction holes used to mount the bookshelf end-panels to the counter.
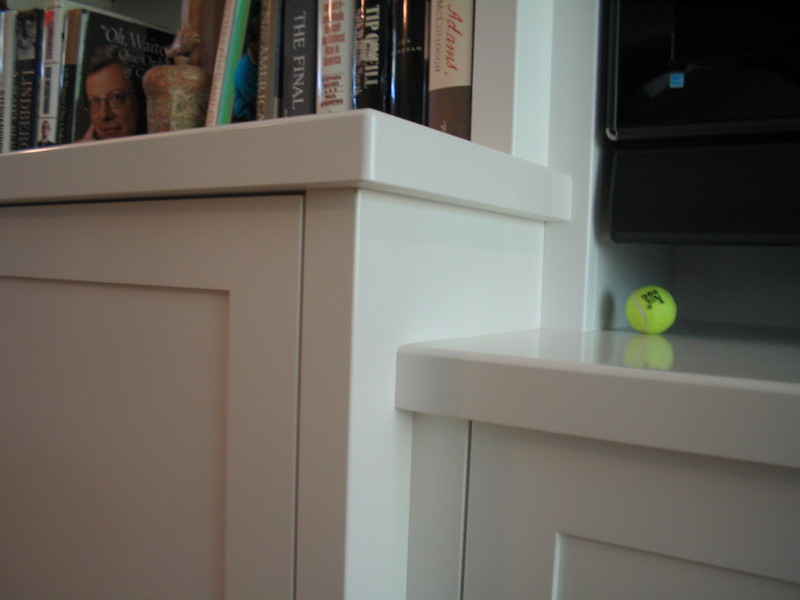
 I used this one to scribe wainscot to a cabinet. There's also a closeup of the resulting fit (before caulk/paint). I took the necessary measurements, enlarged them by 3/16" to work with a 1/4" bit and 5/8" guide, marked a scrap of 1/4" MDF and cut it on the table saw. Due to the sloping floor, I had to tweak the template from 90 degrees and take a second pass.
[ comment | link | top ]