
Home : Workshop : Woodwork :
 How stiff a shelf is determines how much it will sag when a given weight is applied. How much a shelf sags over time, both long and short term, is relative to stiffness and the materials used. At least for now, I can only provide some short term comparisons.
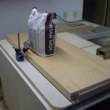
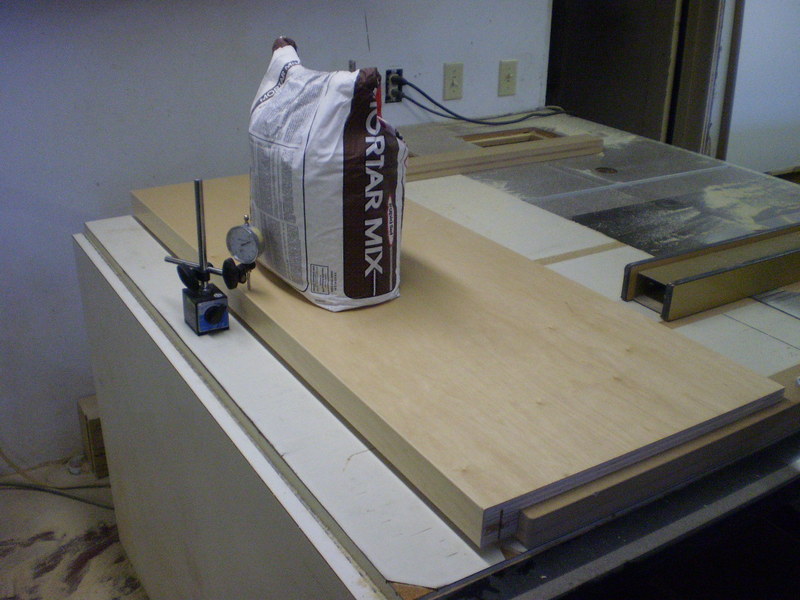
The basic setup is shelf support rails spaced 43" apart, a .001" dial indicator, and a 46.68 lb bag of mortar. The testing method cannot be directly compared to the Sagulator because the load is spread over a 12 x 6" area (not point loaded on the center-line)... Relative percentage comparisons don't work either (removed).
I started with a simple 3/4 x 12" deep melamine shelf. After gently setting the full weight of the mortar on the shelf, the initial reading on the dial indicator was .322" and the dial kept visibly moving to .351" (+.029, almost 1/32") in a few minutes. While the obvious question is how much more the sag would increase over an hour, or 12 hours/days/month/years, this post is (at least for now) more about the relative stiffness of materials/construction methods.
...I added a 1-1/4 x 3/4" hard Maple edge to the above shelf and got .111 initial sag. That's close to two thirds less than the .322 initial sag without the edging. Here the dial only moved .006 after a few minutes (and .015 after around 8 hrs, still less than the above ,029 after only a few minutes).
Testing a steel reinforced melamine shelf, similar to my Library Shelves (below), I got .055 initial sag and only a few more thousandths of sag after a few minutes (.058)... While the sag is half the Maple edge, it's not a direct/fair comparison. The Maple edged shelf is the only reinforced shelf that doesn't have a 1-3/4" thick edge.
The next test was a similar sized veneered MDF (1-1/4 x 3/4 frame, 1/4 stringers and skin - all MDF) torsion box shelf. Initial sag was .048 and .051 after a few minutes. Overall, surprisingly similar to the steel reinforced shelf. The .007 difference in sag is insignificant. This needs long term testing to see if my belief that steel has better long term memory (less affected by extended loading) has any validity.
The final test was an over engineered (labor intensive construction method) library shelf with 1/4" taller steel (1-1/4 x 1/8 VS 1 x 1/8) reinforcement (same 1-3/4" edge thickness). Here the results were even better (.034/.036, more than a third less than 1 x 1/8 steel), but the shelves were also made from plywood (VS PB) and are over 6" deeper (18-5/8").
[ comment | link | top ]
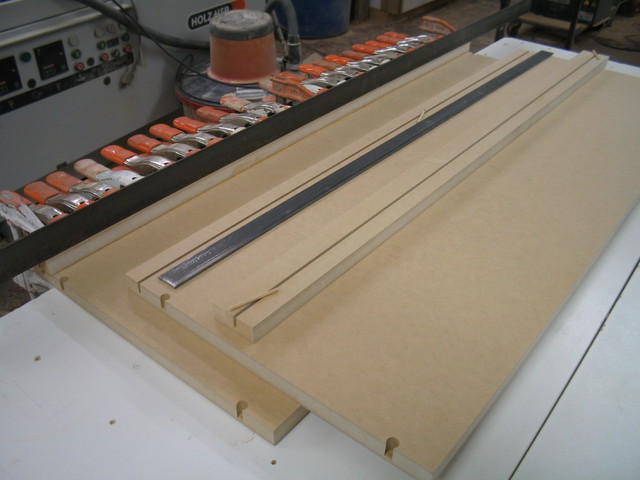
 After experimenting with some rather complex shelf reinforcement (Tension Rod Shelves, below) I've settled on a 3/4" build-down with 1/8 x 9/16" matching slots - in the bottom of the shelf and the top of the build-down strip - that accommodate 1/8 x 1" steel. The steel/shelf is pretensioned with 1/8" dowel - a piece an inch or two long in each end of the build-down strip slot and another piece in the center of the shelf slot.
I use spring clamps (... or a vacuum frame press) to hold the pieces together while the glue cures. With MDF a piece of angle-iron between the clamps and MDF is needed to create some tension, minimize MDF flex and keep the slight camber a fair curve. Viewed from a different angle you can see that I use small bar clamps where the dowels are, I add two intermediate ones on longer spans.
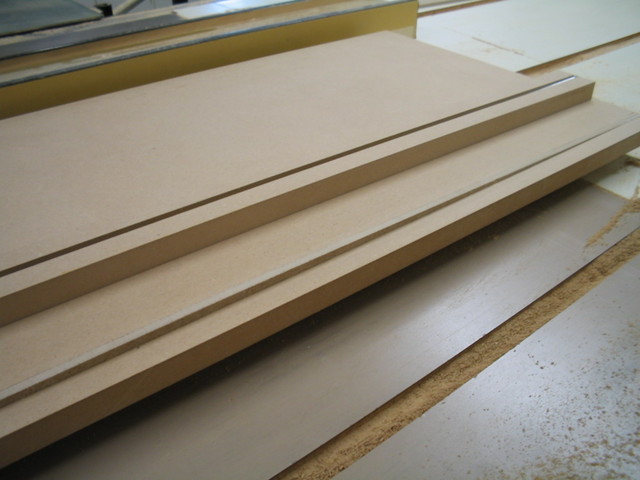
With stacked edges, getting a flush joint easy because the shelf gets ripped to size after the glue dries. Stacked edges also don't have unlike material (e.g. MDF edge VS face density) or grain/color not matching issues.
With MDF, I prep the edge with OneTime. With plywood, or particleboard, I use edgebanding that's as thick as the radius that I plan to put on the shelf edge (e.g. 1.5mm banding w/ 1/16" radius). The seam is hardly noticeable because its where the radius breaks.
The holes on the ends are for Recessed Shelf Clips which I have to drill before glue-up (undermount drill head). I use a 1/2" flush trim router bit to flush out the slightly longer buildup strips.
Since there is very little material left above and below the steel, good adhesion to the sidewalls is important. I thoroughly wet the slots and coat the steel with glue. I use a large bore needle on a squeeze bottle to spread the glue in the slots for 1/8" steel and a Minicol biscuit glue bottle (tongue depressor for spreading) for 3/16" steel. The primary strength is the vertical 1" and I probably don't gain much with the extra 1/16" thickness.
The first time I used this method, the longest shelves were 42" and loaded with books. When I grabbed a picture a year or so later, the shelves still had a very slight crown.
[ comment | link | top ]
 My earlier aluminum reinforced shelves hadn't worked very well (sagged over time). I figured that threaded rod would allow me to counter the shelf load by adjusting tension on the rod using recessed nuts on each end. I cannot remember everything I tried, but applying tension to a straight rod isn't enough. I tried straight slots with spacers so that the rod would be lower at the center of the shelf. This worked but required way too much tension (the self started to delaminate). I then made a router template so that I could route mirrored curved slots. While this was a definite improvement, it still required a lot of tension. The only way I could get this design to work reasonably well was to shift the slots so that all of the rod was below the shelf proper (pictured). The problem was that the labor involved had increased exponentially. It wasn't a dead end as it gave me the idea of pre-cambered steel reinforcement (Library Shelves, above).
[ comment | link | top ]
Shelves
Most built-ins look much better when the design isn't constrained by the load limits of stock materials. Applying 1x2" solid wood to the edge of the shelf is a common solution. For me, its easier to build up the edge. Adding steel to the stacked edge is relatively painless and allows for significantly longer spans.
Library Shelves
Tension Rod Shelves
Shelf Spans
Library Shelves
Tension Rod Shelves
Shelf Spans
Shelf Stiffness
 How stiff a shelf is determines how much it will sag when a given weight is applied. How much a shelf sags over time, both long and short term, is relative to stiffness and the materials used. At least for now, I can only provide some short term comparisons.
The basic setup is shelf support rails spaced 43" apart, a .001" dial indicator, and a 46.68 lb bag of mortar. The testing method cannot be directly compared to the Sagulator because the load is spread over a 12 x 6" area (not point loaded on the center-line)... Relative percentage comparisons don't work either (removed).
I started with a simple 3/4 x 12" deep melamine shelf. After gently setting the full weight of the mortar on the shelf, the initial reading on the dial indicator was .322" and the dial kept visibly moving to .351" (+.029, almost 1/32") in a few minutes. While the obvious question is how much more the sag would increase over an hour, or 12 hours/days/month/years, this post is (at least for now) more about the relative stiffness of materials/construction methods.
...I added a 1-1/4 x 3/4" hard Maple edge to the above shelf and got .111 initial sag. That's close to two thirds less than the .322 initial sag without the edging. Here the dial only moved .006 after a few minutes (and .015 after around 8 hrs, still less than the above ,029 after only a few minutes).
Testing a steel reinforced melamine shelf, similar to my Library Shelves (below), I got .055 initial sag and only a few more thousandths of sag after a few minutes (.058)... While the sag is half the Maple edge, it's not a direct/fair comparison. The Maple edged shelf is the only reinforced shelf that doesn't have a 1-3/4" thick edge.
The next test was a similar sized veneered MDF (1-1/4 x 3/4 frame, 1/4 stringers and skin - all MDF) torsion box shelf. Initial sag was .048 and .051 after a few minutes. Overall, surprisingly similar to the steel reinforced shelf. The .007 difference in sag is insignificant. This needs long term testing to see if my belief that steel has better long term memory (less affected by extended loading) has any validity.
The final test was an over engineered (labor intensive construction method) library shelf with 1/4" taller steel (1-1/4 x 1/8 VS 1 x 1/8) reinforcement (same 1-3/4" edge thickness). Here the results were even better (.034/.036, more than a third less than 1 x 1/8 steel), but the shelves were also made from plywood (VS PB) and are over 6" deeper (18-5/8").
[ comment | link | top ]
Library Shelves
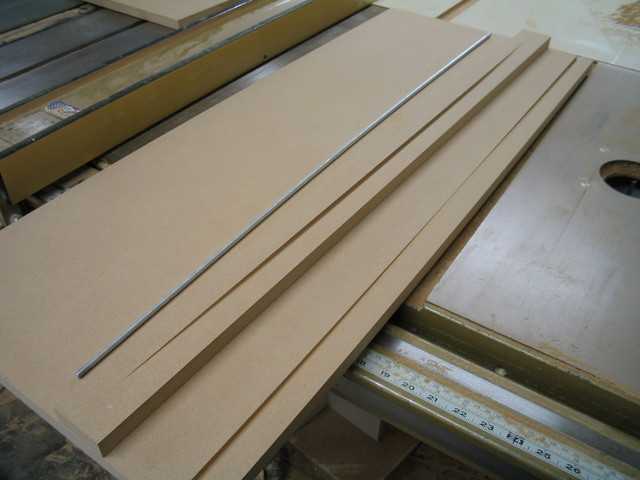
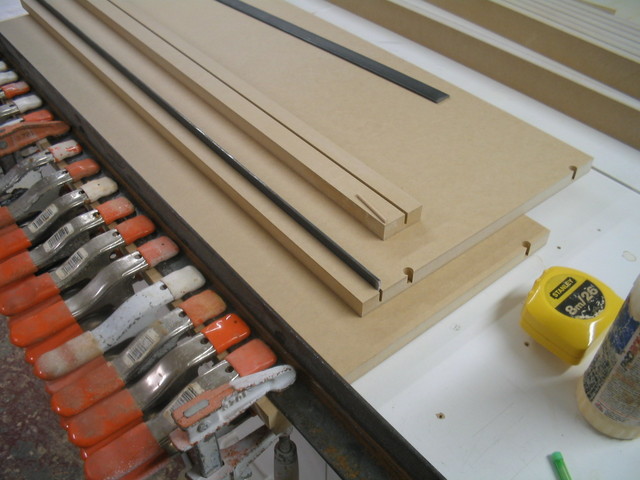 After experimenting with some rather complex shelf reinforcement (Tension Rod Shelves, below) I've settled on a 3/4" build-down with 1/8 x 9/16" matching slots - in the bottom of the shelf and the top of the build-down strip - that accommodate 1/8 x 1" steel. The steel/shelf is pretensioned with 1/8" dowel - a piece an inch or two long in each end of the build-down strip slot and another piece in the center of the shelf slot.
 I use spring clamps (... or a vacuum frame press) to hold the pieces together while the glue cures. With MDF a piece of angle-iron between the clamps and MDF is needed to create some tension, minimize MDF flex and keep the slight camber a fair curve. Viewed from a different angle you can see that I use small bar clamps where the dowels are, I add two intermediate ones on longer spans.
With stacked edges, getting a flush joint easy because the shelf gets ripped to size after the glue dries. Stacked edges also don't have unlike material (e.g. MDF edge VS face density) or grain/color not matching issues.
With MDF, I prep the edge with OneTime. With plywood, or particleboard, I use edgebanding that's as thick as the radius that I plan to put on the shelf edge (e.g. 1.5mm banding w/ 1/16" radius). The seam is hardly noticeable because its where the radius breaks.
The holes on the ends are for Recessed Shelf Clips which I have to drill before glue-up (undermount drill head). I use a 1/2" flush trim router bit to flush out the slightly longer buildup strips.
Since there is very little material left above and below the steel, good adhesion to the sidewalls is important. I thoroughly wet the slots and coat the steel with glue. I use a large bore needle on a squeeze bottle to spread the glue in the slots for 1/8" steel and a Minicol biscuit glue bottle (tongue depressor for spreading) for 3/16" steel. The primary strength is the vertical 1" and I probably don't gain much with the extra 1/16" thickness.
The first time I used this method, the longest shelves were 42" and loaded with books. When I grabbed a picture a year or so later, the shelves still had a very slight crown.
[ comment | link | top ]
Tension Rod Shelves
 My earlier aluminum reinforced shelves hadn't worked very well (sagged over time). I figured that threaded rod would allow me to counter the shelf load by adjusting tension on the rod using recessed nuts on each end. I cannot remember everything I tried, but applying tension to a straight rod isn't enough. I tried straight slots with spacers so that the rod would be lower at the center of the shelf. This worked but required way too much tension (the self started to delaminate). I then made a router template so that I could route mirrored curved slots. While this was a definite improvement, it still required a lot of tension. The only way I could get this design to work reasonably well was to shift the slots so that all of the rod was below the shelf proper (pictured). The problem was that the labor involved had increased exponentially. It wasn't a dead end as it gave me the idea of pre-cambered steel reinforcement (Library Shelves, above).
[ comment | link | top ]
Shelf Spans
WoodBin's Shelf Design Guidelines seem a tad generous for book shelves. The examples below are for a 3/4" thick x 10" deep shelf w/ 20lbs (books are 20-25... A Sagulator note says 20-40 and that some libraries spec 35) per foot. The numbers in parenthesis are the Sagulator (below) calculated deflection.
Particleboard - 26" (.21")
Plywood - 32" (.05")
Yellow pine - 36" (.05")
Red oak - 44" (.13)
1-1/2" edging on plywood - 42"
I agree with WoodNet's suggested Shelving Spans for books on a 10" deep x 3/4" thick shelf.
Particle Board - 24" (.08)
Plywood - 30" (.04)
Solid (13/16") - 36" (.04)
1-1/4" edging on plywood - 36"
The The Sagulator is a shelf deflection calculator. The examples are based on a 10" deep by 3/4" thick shelf spanning 36" and evenly loaded with 60lbs (20lbs per foot).
Plywood - .09"
MDF - .30"
Melamine - .41"
Solid wood - .06-9"
The melamine/MDF numbers seem a bit high... I should probably redo with a 30" span (common in lighter duty applications). I also would have thought that there would have been a bigger difference between solid wood and plywood.
Something none of the above consider is time. The deflection of shelves containing PB or MDF will increase noticeably over time. It took at least a year before I saw noticeable sag in shelves I made with aluminum reinforced Classic Core (plywood w/ MDF outer plys). Only my steel reinforced shelves have stood the test of time. I haven't used enough plywood shelves to know how they are affected over time. but my feeling is that the effect would be less because real wood has a better memory.
See also: Particleboard and MDF for Shelving by the Composite Panel Association which has other related Technical-Bulletins.
[ comment | link | top ]