
Home : Workshop : Metalwork :
 I've had a Harbor Freight Mini Mill for a few years now and have been able to do quite a lot with it. The current setup has worked quite well. The raised side counters are a big help when working with long stock and a handy height for tools, parts, etc.

 While I love the spin indexer, collet blocks simplify 60 (hex) and 90 (square) degree increment rotation projects.
With the addition of a washer between the block and closing nut, repeat x-axis positioning is easy (stops the back of the block against the left end of my vise). An AXK3047 needle bearing (< $2 on eBay) has nice washers (flat and hard) that are real close to the right size (ID is a tad small - carbide side cutting tool worked, HHS boring bar didn't). I'm currently using the whole bearing (4mm thick).
I couldn't find an affordable 3/16" or 5mm round head/pin spanner. While the adjustable ones were affordable (~$8 or 11), they had the wrong size pins (4 or 6mm). I ended up modifying a standard "38-42" spanner (~$3 on AliExpress). While the closing nuts are a hair over 42mm, I had to grind a lot more than a hair off the heel to get a wide enough opening (..."45-52", same as the for the mini-mill, would have been a better choice), I freehanded the ~5mm pin shape using a grinder and ~1/2" diamond mandrel.
I don't know if it's typical, but both my nuts have definite good/in and bad/out sides.
[ comment | link | top ]
 As with everything I mount to the mill table, I wanted to make setups easily repeatable. The unit is real close to 4" deep and just fits in my 3 x 4" screwless vise. It just so happens that butting it against my -20mm stop is the right place for it.
The only problem was that the rotary table wanted to lift up when tightening the vise. The back face of the table base was way out of square to the bottom and machining it square fixed that. Since I had the table apart, I cleaned it and lubricated everything with high pressure lithium grease. The crankshaft has no keyway or flat (the setscrew dimples made it hard to take apart), so I machined a flat for the knob setscrew. While I was at it, I widened the center of a 10x24mm needle bearing race to fit the 11mm crankshaft. Not being happy with the action of the small knob, I enlarged it with a plate and a free spinning delrin knob.... more
[ page | top ]
 I don't remember the initial motivation, but adding needle thrust bearings makes moving the Y axis very smooth/easy. The only thing you can see in the image is the rear thrust bearing (AXK1226) protruding above the bearing block (just clearing the carriage). Cutting that recess (boring bar) was relatively easy because I could chuck the front of the bearing block against the face of the 3-jaw. The recess for the front bearing (AXK1024) required a fixture. I used a tapped and reamed mounting plate mounted to a shaft with two setscrews. I used a 10mm drill rod shaft and a 10 > 12mm bushing inside the block. A 1/2" shaft with the end turned down to 12mm might have been easier.
[ comment | link | top ]
 I'd seen drill presses with a light under the head, but I'd never used one. Now that I have one, I wonder why all drill presses/mills don't have one. I started with a 10w LED (~60w incandesent) floodlight and that was way too bright for metalworking (glare off vise/work). I'm pretty sure a 3w LED would be ideal. The 4w LED I'm using was also too bright until I hooked it up to an under powered (volt and amp) power supply.
I drilled/tapped (m3) two holes in the head to mount the 10w floodlight. I used epoxy and one of those holes to mount the 4w LED. The homemade reflector hasn't fallen off yet (not adhered/mounted). The wires wrap around the spring arm guide post and a couple cable ties keep them there and out of the way.
There are tons of cheap LED options on eBay (my 4w was $1.03 shipped) and I'm not sure what I'd try if the 4w fails. My floodlight fixture ($4 shipped) was a bit too thick, but there are thinner (< 1") 3w fixtures that might be worth a try.
[ comment | link | top ]
 Many toolmakers vises have threaded holes that are handy for mounting material stops. A 10 series T-slot extrusion mounted to the vise is the best solution I have found for accurately machining long material.
I drilled incremental holes into the bottom of a t-slot and made a stop with dowels that mate with the t-slot holes. The end of the extrusion was tapped to match the vise (m8) and a setscrew was used to mate the two. Some careful shaving off the end of the extrusion was needed to get the slot with holes facing forward.
The stop shown is simple spring loaded block stop that is easy to move/position. There is a brief (10 sec) YouTube video showing how they work.... more
[ page | top ]
 I don't remember what had me interested in a spin indexer, but a friend was listening and got me one for Christmas. It's rather big for the mini-mill, but locating it at the end of the table has not unduly interfered with the small stuff I have been working with at the same time... more
[ page | top ]
 Blind hole drilling/reaming/tapping had me wanting an easy way to set cutting depths relative to the top of the material. Being able to easily adjust/(re)set milling depths was a bonus (I haven't used the z-axis knob since installing this). As is, the stop has a range of ~38mm/1-1/2" and can be adjusted in 1mm (full turn, setscrew facing forward) to .1mm (~.004") per facet increments (.05mm if you count the smaller facets).
The top of the m6 x 1mm adjusting rod is a decagon (1mm/10=.1mm per facet) milled from 1-1/8" cold rolled rod on a spin indexer. The rod passes though a threaded C shape milled piece of 3/4 square cold rolled that is held to the stock stop with two m4 setscrews. There is a nylon thumb screw on the side to keep the rod from vibrating out of position. There is also a steel rule screwed to the back of the C with two m3 screws.
With the stop set at a multiple of 10mm, a quick/rough stop height can be set by using the ruler to visually set the stop a measured distance from the head. When accuracy is required, I touch the bit against the stock and slide/set the stop up against the head. The stop can then be turned to accurately cut anything from a couple thousandths to whatever. The knurled aluminum cap on the bottom of the rod easily spins the weighted (decagon) rod when setting deep cuts.
I have a 1/4-20 threaded mounting block that could be finished out with an inch scale and 10 facet (.005" per) stop if anyone is interested in purchasing it.
[ comment | link | top ]
 I had gotten comfortable with using a folding hex key set with the vise, but my mini lathe lever nut got me thinking. I wish I had thought of this years ago, it's so much easier to use.
The body is 5/8" drill rod and the arm is 3/8". The body is drilled to fit a piece of 6mm allen key which is held in place (/prevented from turning) by two m6 x 5mm setscrews. The allen key hole is counter-bored to allow press fitting the the head of the bolt so that the bottom of the head is flush with the handle body. We'll see how long the press fit holds (...it did work its way out a bit, but had to be pressed back), a pin or setscrew(s) could be added if needed (... done).
The length of the arm (~120mm) and the distance of the arm hole from the end of the handle body (~40mm) are designed so that the arm just clears the vise when the angle of the bolt/handle is lowest (max out before a closer notch is used). There is a grove in the middle of the arm and a setscrew to keep it centered on the body (...now a mini thumbscrew). A ball plunger setscrew (from the inside) would allow the arm to be moved more easily if it ever got in the way (...rare).
...I made a new one with a ball detent and threaded rod (instead of a bolt).
[ comment | link | top ]
 All of my small part machining is done with the left front corner of the vise being 0/0 on my DRO's. Maybe I haven't spent enough, but I have not had much luck with the spring loaded edge (and center) finders. I use a piece of 1/2" drill rod with a notch .253" deep (leaving .247) and a .003" feeler gage (.247 +.003 = center/0) to zero my DRO's... To account for spindle run-out I locate the flat on the drill rod 90 degres to peak run-out.
When I came up with this, I didn't realize that electronic edge finders could be had for less than $20 (+12 for a 20mm collet, +4 for UM-5 batteries), but I think mine is less susceptible to my dyslexic tendencies (i.e. damage from moving the table the wrong way)... and the electronic one won't work with the ER-20 collet chuck that I now use for almost all drilling/milling (>= ER-32 is required).
[ comment | link | top ]
 Having to tap a bunch of holes motivated me to install a reversing switch. I used what I had and made it work. The switch is a on/on push button switch. When the (epoxied on) button is high, and and a band of black is visible, the switch runs the mill in reverse. The switch is a circuit board type that I soldered to a mini circuit board (2 holes per pad). I screwed the board to a piece if 1/4" plywood to square and reinforce the assembly (the box cover lip touches it). The assembly was then hot-melted to the fuse body (turned 180 to provide a straight surface).
This post got me started (and may be more useful than mine).
[ comment | link | top ]
 Not the typical meaning, but I don't know what else to call it. The cradle is two pieces of 1/2" thick aluminum that register to fixed T-nuts via locating pins (the screws are optional). Once setup, the vise is easy to remove and replace so long as the T-nuts don't get in the way of another setup. The vise won't be perfectly square when reset, but the bolt/setscrew setup makes it easy to tweak the vise square. It's not clear in the image, but there are four allen head bolts that run through the aluminum. The tips of the bolts contact the vise and there are set-screws that hit the plain shank portion of the bolts. Vise squareness is adjusted by loosening/tightening opposing bolts (it doesn't take much).
[ comment | link | top ]
 I've been quite happy with my digital depth gage DRO's. I originally had a 6" one on the front, but it was too limiting. It seems there are numerous versions and I was lucky to get an 8" one that was small enough. I have since cut off the bottom arm. The location is such that inadvertently hitting the arm hasn't been a problem. The side DRO is always out of the way and relatively easy to read. All my mounts are friction/wedge fit shoulder screws.
[ comment | link | top ]
 Enco used to have a really good price on their five piece fly-cutter set. I'd never use the big one on the mini mill, but it has worked out real well for squaring up the machine and vise. I used scrap 1/2" square steel and drilled/milled/taped it to hold a dial indicator at 90 degrees. One end holds the indicator square to the table. When the post is square parallel to the table (R/L), the dial indicator reading will be the same when the arbor is rotated back and forth 180 degrees. Rotating the indicator from the front to back of the table will read the same if the post is square perpendicular to the table (F/B)... Apparently this is called tramming (trammed/in tram), "to adjust, align, or measure with a trammel"*.
 The other end of the 1/2" steel holds the dial indicator square to the rear vise face. Using a pin to lock the arbor in place, and a straight piece of angle, squaring the vice to the table is relatively easy (much easier with the Vise Cradle). Move the table from one end to the other and then adjust the vise by splitting the difference in the readings... While the heavy angle I used to use was nice and straight (now gone), I think that running the dial indicator across the back face of the vise itself (even if its relatively small) may be just as accurate.
[ comment | link | top ]
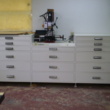
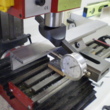
Mini Mill
 I've had a Harbor Freight Mini Mill for a few years now and have been able to do quite a lot with it. The current setup has worked quite well. The raised side counters are a big help when working with long stock and a handy height for tools, parts, etc.
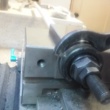
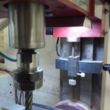
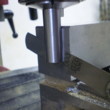
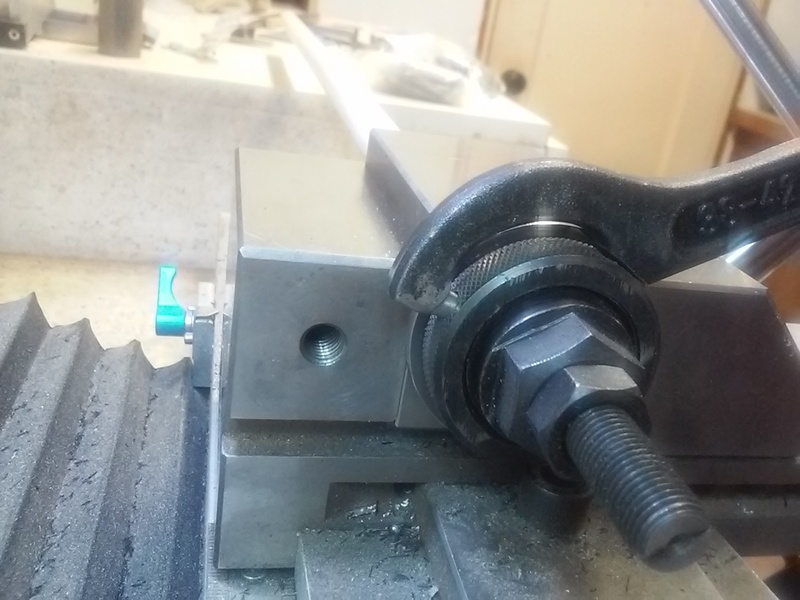
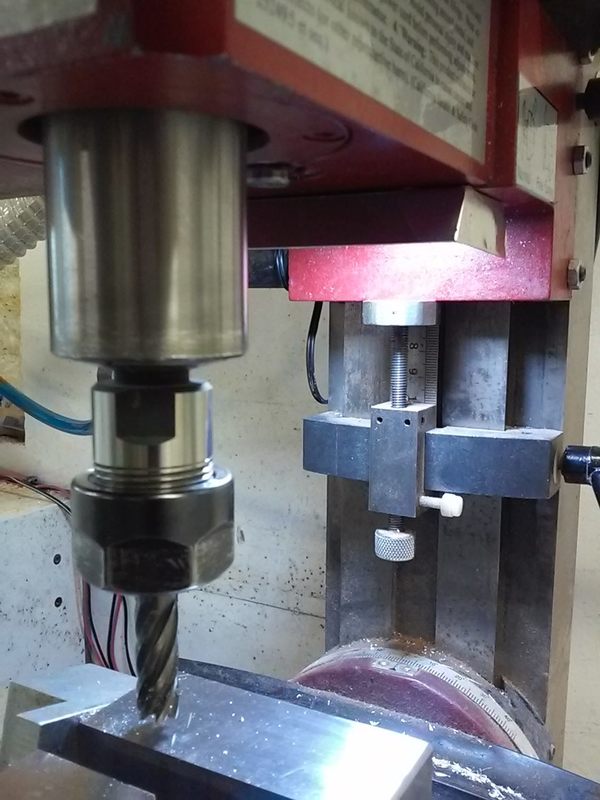
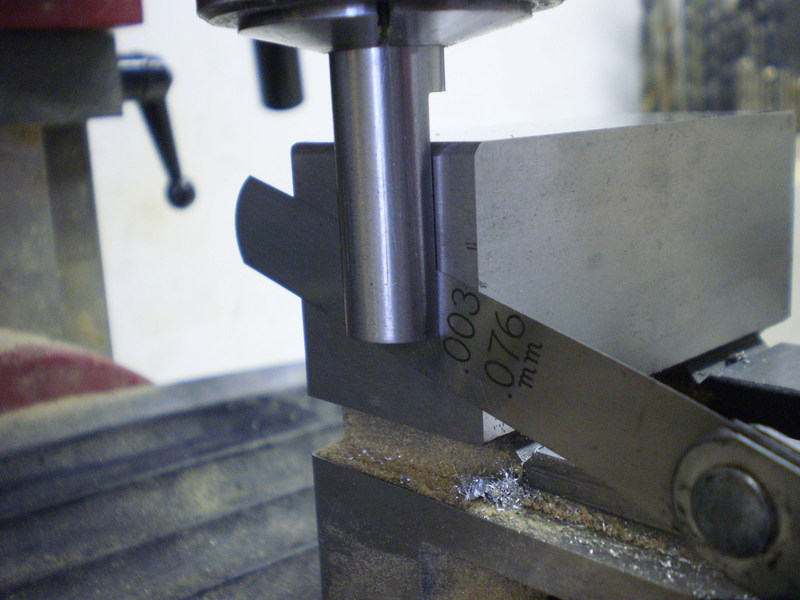
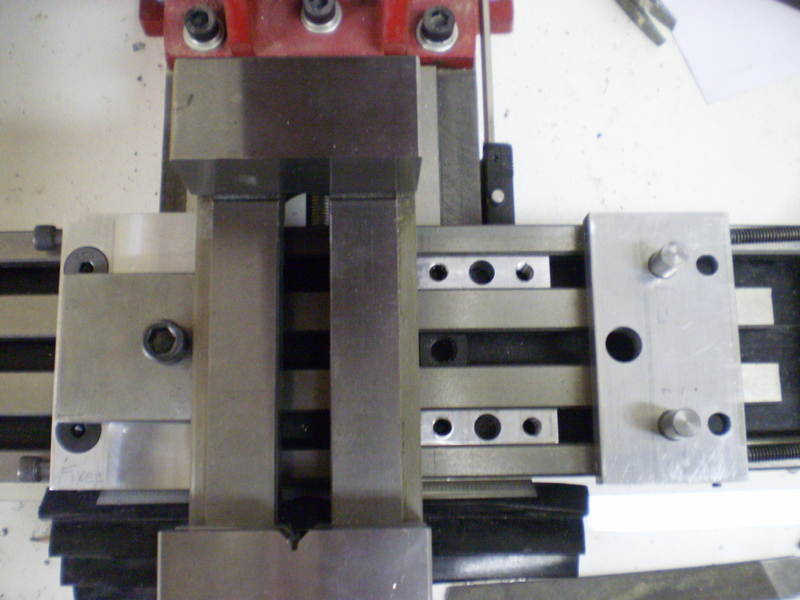
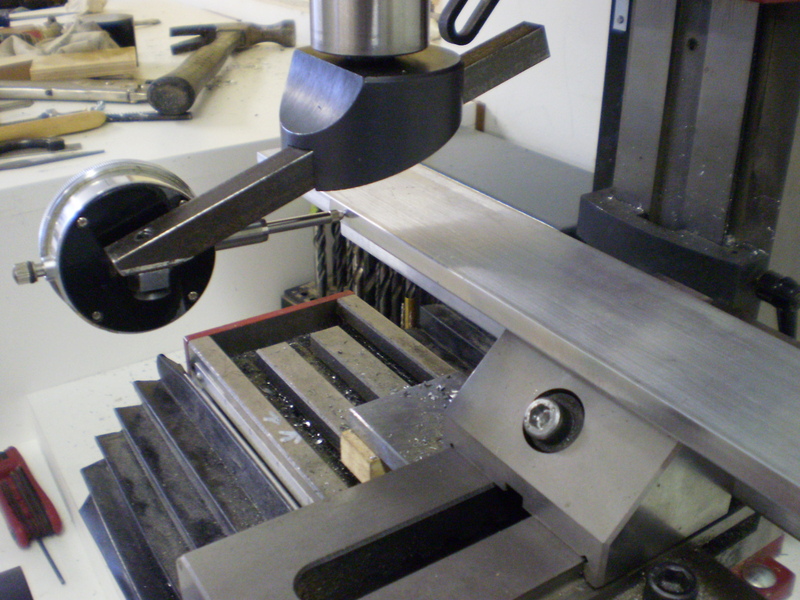
5c Collet Blocks
 While I love the spin indexer, collet blocks simplify 60 (hex) and 90 (square) degree increment rotation projects.
 With the addition of a washer between the block and closing nut, repeat x-axis positioning is easy (stops the back of the block against the left end of my vise). An AXK3047 needle bearing (< $2 on eBay) has nice washers (flat and hard) that are real close to the right size (ID is a tad small - carbide side cutting tool worked, HHS boring bar didn't). I'm currently using the whole bearing (4mm thick).
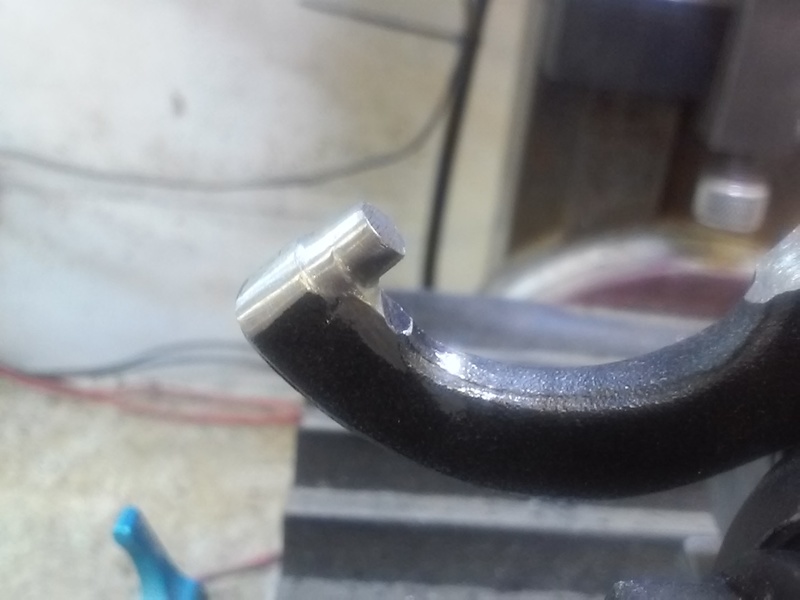
I couldn't find an affordable 3/16" or 5mm round head/pin spanner. While the adjustable ones were affordable (~$8 or 11), they had the wrong size pins (4 or 6mm). I ended up modifying a standard "38-42" spanner (~$3 on AliExpress). While the closing nuts are a hair over 42mm, I had to grind a lot more than a hair off the heel to get a wide enough opening (..."45-52", same as the for the mini-mill, would have been a better choice), I freehanded the ~5mm pin shape using a grinder and ~1/2" diamond mandrel.
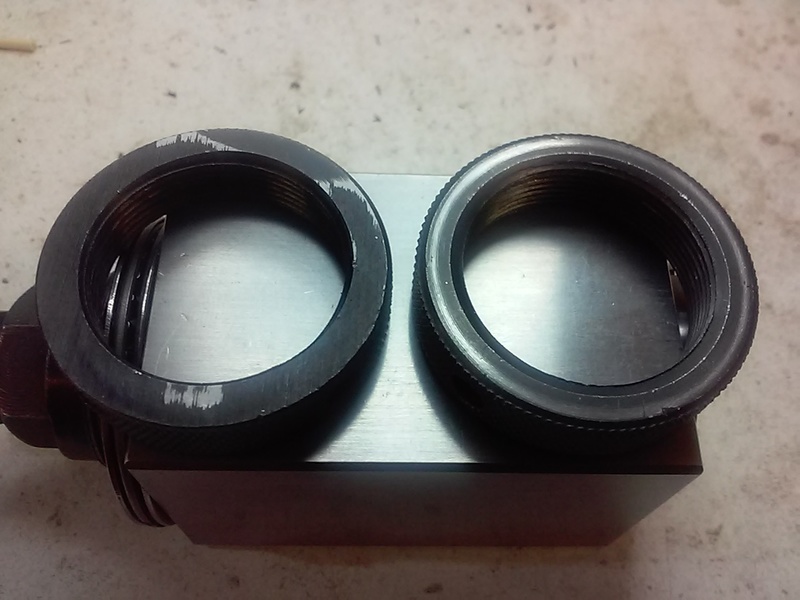
I don't know if it's typical, but both my nuts have definite good/in and bad/out sides.
[ comment | link | top ]
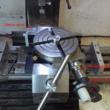
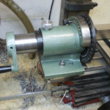
Rotary Table
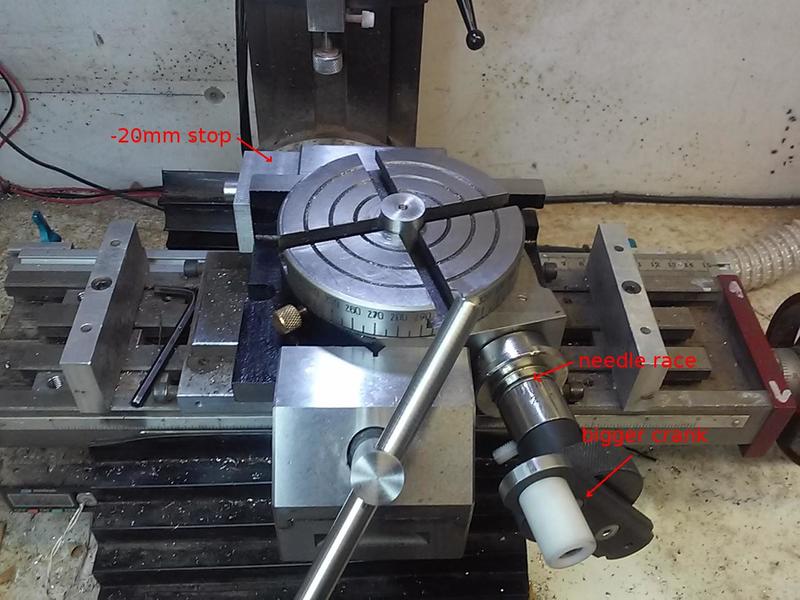 As with everything I mount to the mill table, I wanted to make setups easily repeatable. The unit is real close to 4" deep and just fits in my 3 x 4" screwless vise. It just so happens that butting it against my -20mm stop is the right place for it.
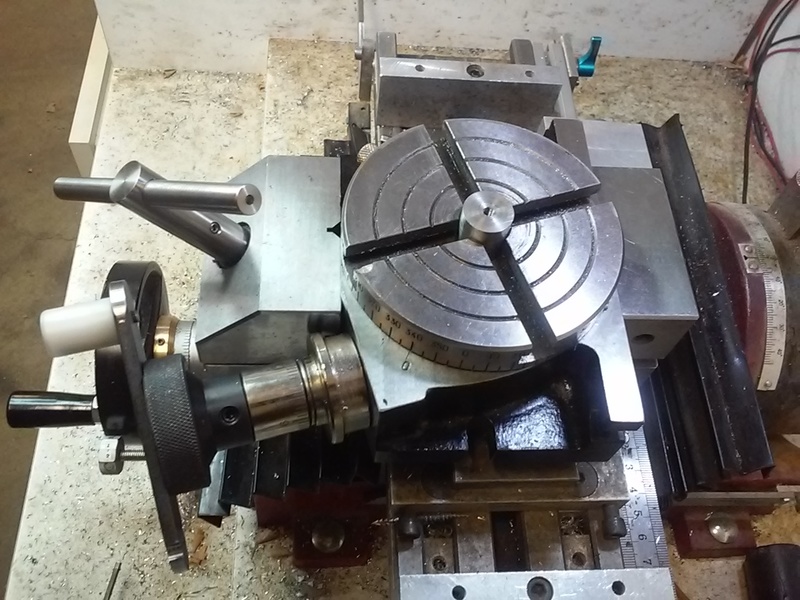
The only problem was that the rotary table wanted to lift up when tightening the vise. The back face of the table base was way out of square to the bottom and machining it square fixed that. Since I had the table apart, I cleaned it and lubricated everything with high pressure lithium grease. The crankshaft has no keyway or flat (the setscrew dimples made it hard to take apart), so I machined a flat for the knob setscrew. While I was at it, I widened the center of a 10x24mm needle bearing race to fit the 11mm crankshaft. Not being happy with the action of the small knob, I enlarged it with a plate and a free spinning delrin knob.... more
[ page | top ]
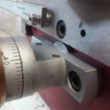
Y Axis Thrust Bearings
 I don't remember the initial motivation, but adding needle thrust bearings makes moving the Y axis very smooth/easy. The only thing you can see in the image is the rear thrust bearing (AXK1226) protruding above the bearing block (just clearing the carriage). Cutting that recess (boring bar) was relatively easy because I could chuck the front of the bearing block against the face of the 3-jaw. The recess for the front bearing (AXK1024) required a fixture. I used a tapped and reamed mounting plate mounted to a shaft with two setscrews. I used a 10mm drill rod shaft and a 10 > 12mm bushing inside the block. A 1/2" shaft with the end turned down to 12mm might have been easier.
[ comment | link | top ]
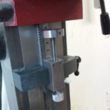
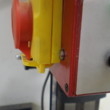
Under Head Light
 I'd seen drill presses with a light under the head, but I'd never used one. Now that I have one, I wonder why all drill presses/mills don't have one. I started with a 10w LED (~60w incandesent) floodlight and that was way too bright for metalworking (glare off vise/work). I'm pretty sure a 3w LED would be ideal. The 4w LED I'm using was also too bright until I hooked it up to an under powered (volt and amp) power supply.
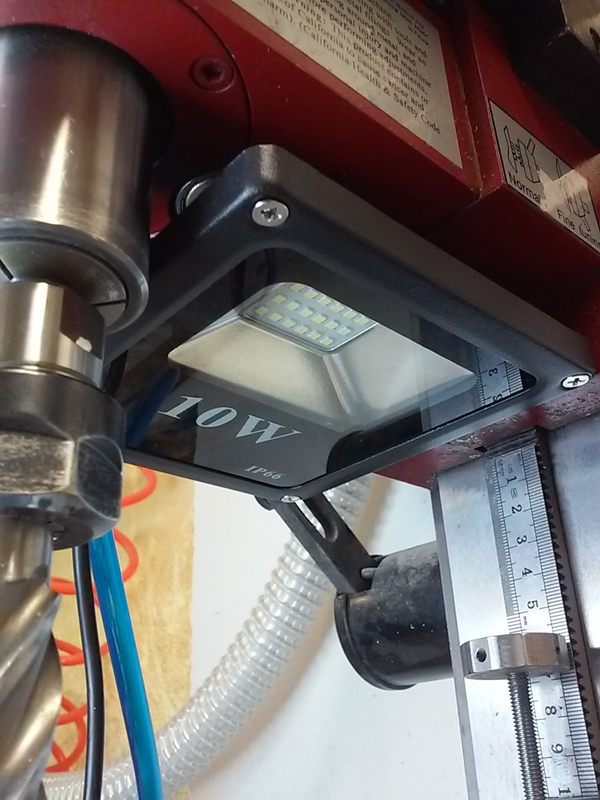
I drilled/tapped (m3) two holes in the head to mount the 10w floodlight. I used epoxy and one of those holes to mount the 4w LED. The homemade reflector hasn't fallen off yet (not adhered/mounted). The wires wrap around the spring arm guide post and a couple cable ties keep them there and out of the way.
There are tons of cheap LED options on eBay (my 4w was $1.03 shipped) and I'm not sure what I'd try if the 4w fails. My floodlight fixture ($4 shipped) was a bit too thick, but there are thinner (< 1") 3w fixtures that might be worth a try.
[ comment | link | top ]
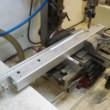
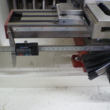
Vise Fence and Stop
 Many toolmakers vises have threaded holes that are handy for mounting material stops. A 10 series T-slot extrusion mounted to the vise is the best solution I have found for accurately machining long material.
 I drilled incremental holes into the bottom of a t-slot and made a stop with dowels that mate with the t-slot holes. The end of the extrusion was tapped to match the vise (m8) and a setscrew was used to mate the two. Some careful shaving off the end of the extrusion was needed to get the slot with holes facing forward.
The stop shown is simple spring loaded block stop that is easy to move/position. There is a brief (10 sec) YouTube video showing how they work.... more
[ page | top ]
Spin Indexer
 I don't remember what had me interested in a spin indexer, but a friend was listening and got me one for Christmas. It's rather big for the mini-mill, but locating it at the end of the table has not unduly interfered with the small stuff I have been working with at the same time... more
[ page | top ]
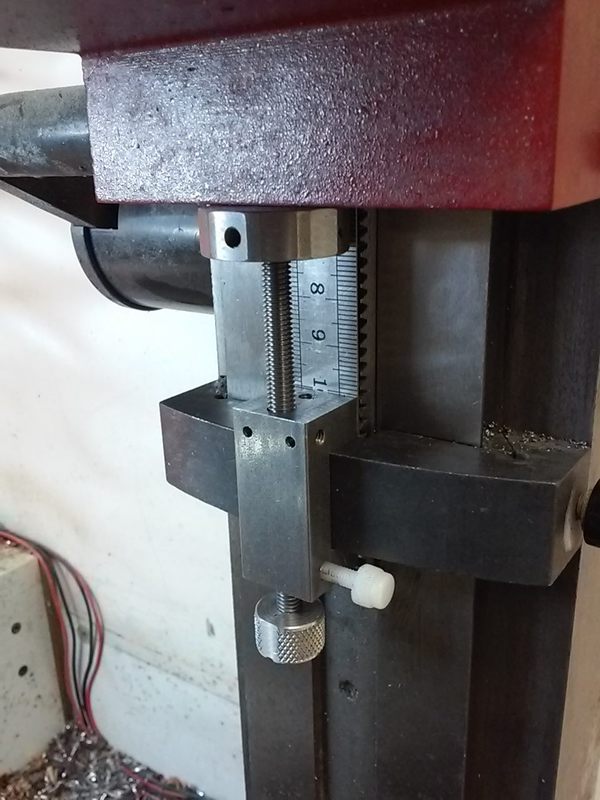
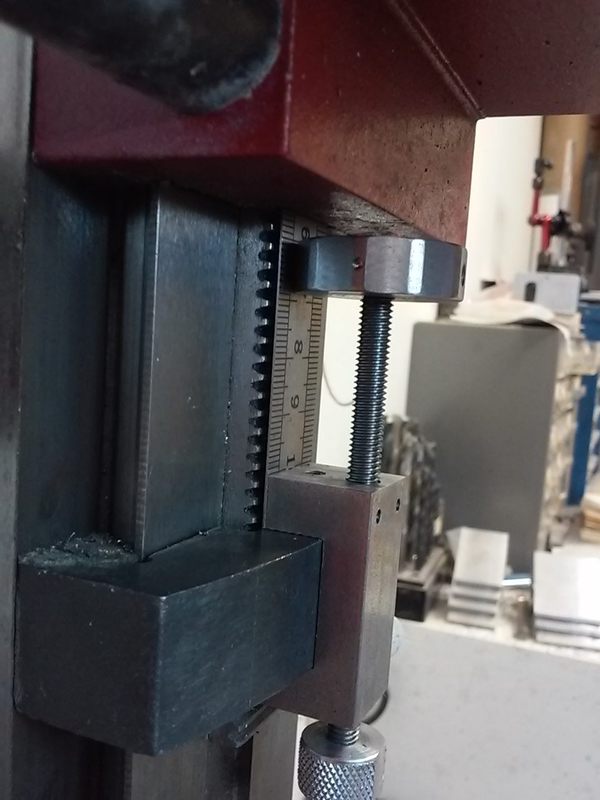
Depth Stop
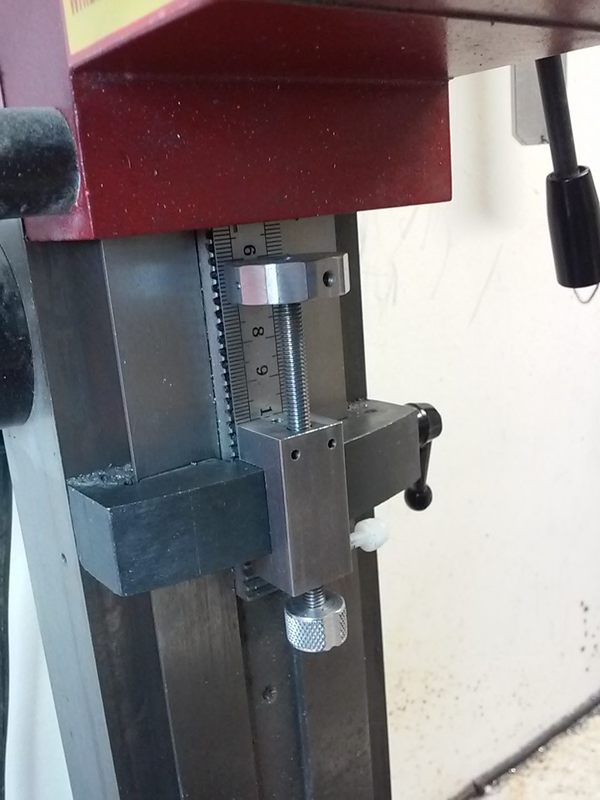 Blind hole drilling/reaming/tapping had me wanting an easy way to set cutting depths relative to the top of the material. Being able to easily adjust/(re)set milling depths was a bonus (I haven't used the z-axis knob since installing this). As is, the stop has a range of ~38mm/1-1/2" and can be adjusted in 1mm (full turn, setscrew facing forward) to .1mm (~.004") per facet increments (.05mm if you count the smaller facets).
The top of the m6 x 1mm adjusting rod is a decagon (1mm/10=.1mm per facet) milled from 1-1/8" cold rolled rod on a spin indexer. The rod passes though a threaded C shape milled piece of 3/4 square cold rolled that is held to the stock stop with two m4 setscrews. There is a nylon thumb screw on the side to keep the rod from vibrating out of position. There is also a steel rule screwed to the back of the C with two m3 screws.
With the stop set at a multiple of 10mm, a quick/rough stop height can be set by using the ruler to visually set the stop a measured distance from the head. When accuracy is required, I touch the bit against the stock and slide/set the stop up against the head. The stop can then be turned to accurately cut anything from a couple thousandths to whatever. The knurled aluminum cap on the bottom of the rod easily spins the weighted (decagon) rod when setting deep cuts.
I have a 1/4-20 threaded mounting block that could be finished out with an inch scale and 10 facet (.005" per) stop if anyone is interested in purchasing it.
[ comment | link | top ]
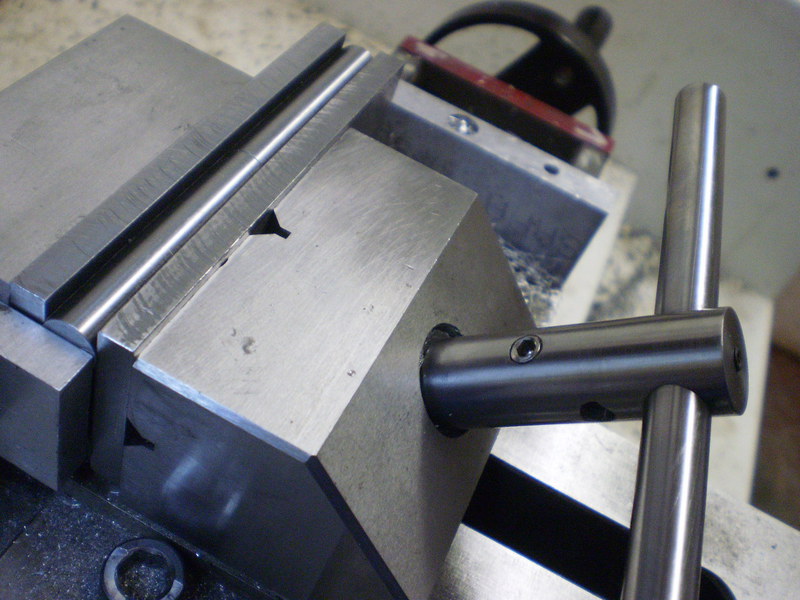
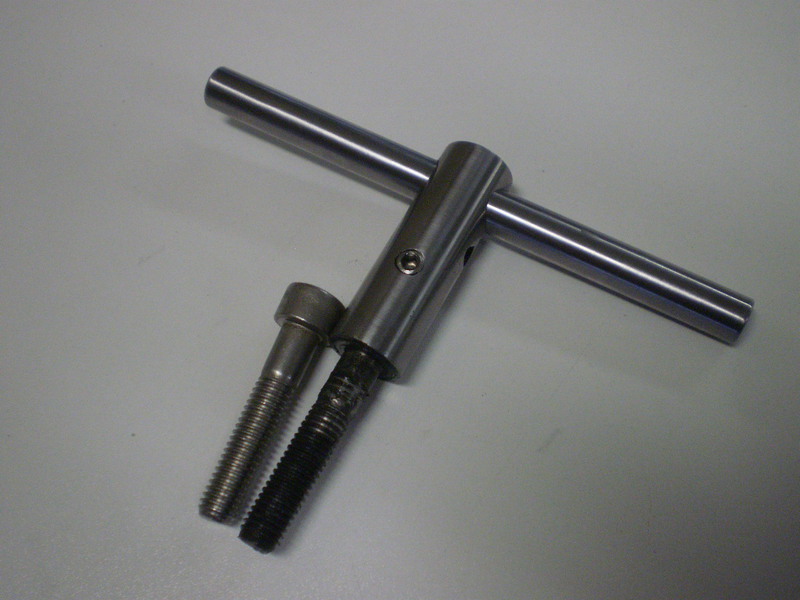
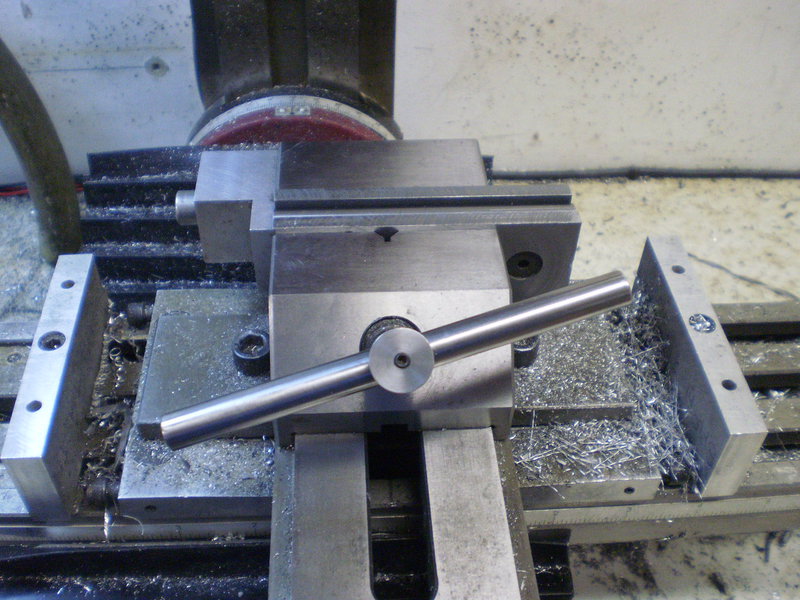
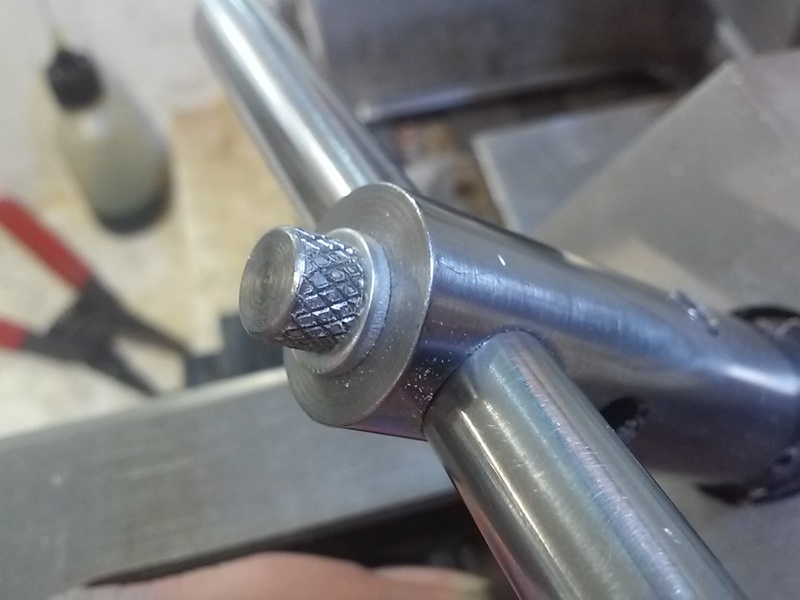
Screwless Vice T-Handle
 I had gotten comfortable with using a folding hex key set with the vise, but my mini lathe lever nut got me thinking. I wish I had thought of this years ago, it's so much easier to use.
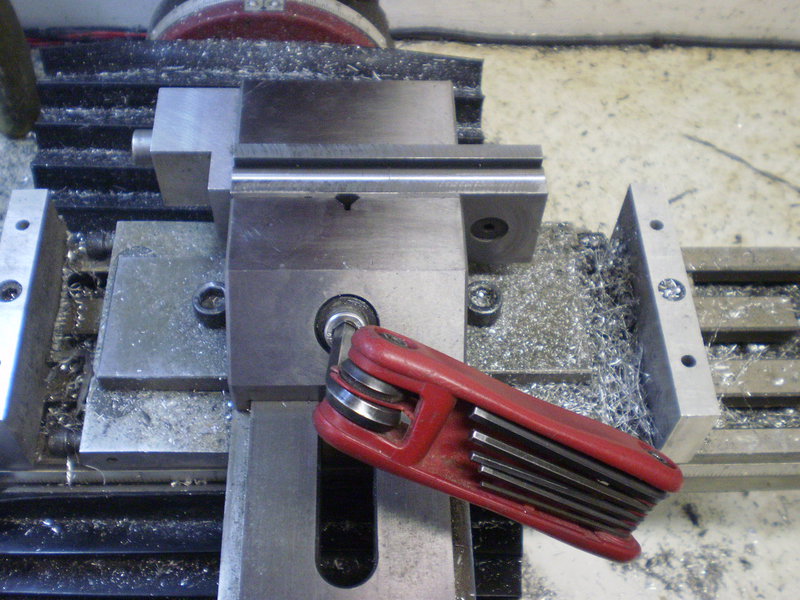
The body is 5/8" drill rod and the arm is 3/8". The body is drilled to fit a piece of 6mm allen key which is held in place (/prevented from turning) by two m6 x 5mm setscrews. The allen key hole is counter-bored to allow press fitting the the head of the bolt so that the bottom of the head is flush with the handle body. We'll see how long the press fit holds (...it did work its way out a bit, but had to be pressed back), a pin or setscrew(s) could be added if needed (... done).
The length of the arm (~120mm) and the distance of the arm hole from the end of the handle body (~40mm) are designed so that the arm just clears the vise when the angle of the bolt/handle is lowest (max out before a closer notch is used). There is a grove in the middle of the arm and a setscrew to keep it centered on the body (...now a mini thumbscrew). A ball plunger setscrew (from the inside) would allow the arm to be moved more easily if it ever got in the way (...rare).
...I made a new one with a ball detent and threaded rod (instead of a bolt).
[ comment | link | top ]
Drill Rod Edge Finder
 All of my small part machining is done with the left front corner of the vise being 0/0 on my DRO's. Maybe I haven't spent enough, but I have not had much luck with the spring loaded edge (and center) finders. I use a piece of 1/2" drill rod with a notch .253" deep (leaving .247) and a .003" feeler gage (.247 +.003 = center/0) to zero my DRO's... To account for spindle run-out I locate the flat on the drill rod 90 degres to peak run-out.
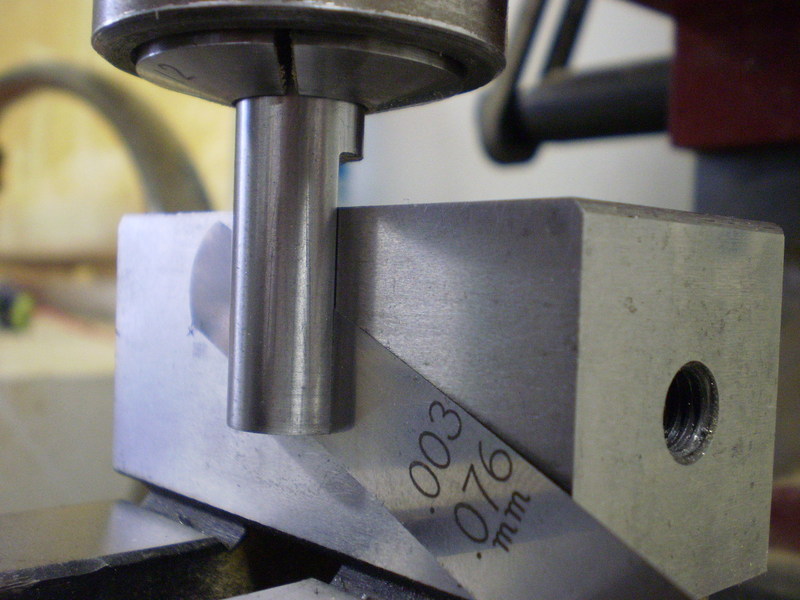
When I came up with this, I didn't realize that electronic edge finders could be had for less than $20 (+12 for a 20mm collet, +4 for UM-5 batteries), but I think mine is less susceptible to my dyslexic tendencies (i.e. damage from moving the table the wrong way)... and the electronic one won't work with the ER-20 collet chuck that I now use for almost all drilling/milling (>= ER-32 is required).
[ comment | link | top ]
Reversing Switch
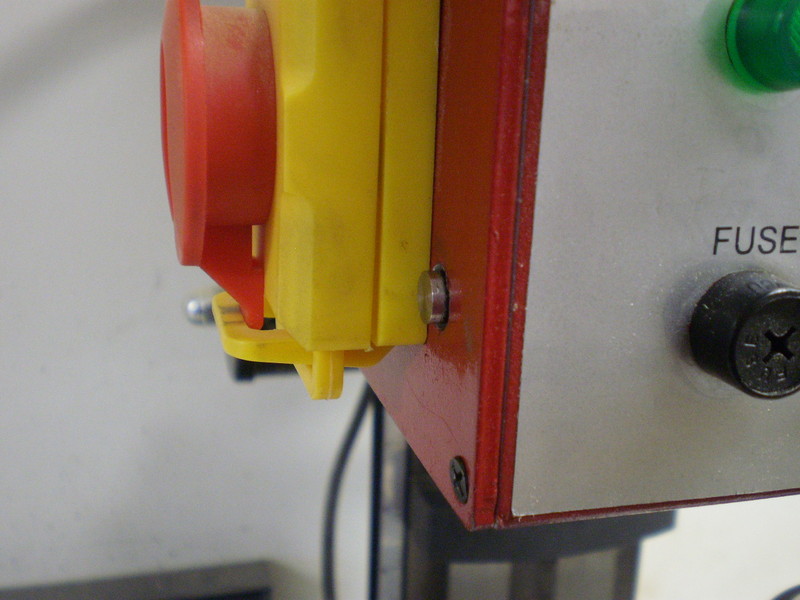 Having to tap a bunch of holes motivated me to install a reversing switch. I used what I had and made it work. The switch is a on/on push button switch. When the (epoxied on) button is high, and and a band of black is visible, the switch runs the mill in reverse. The switch is a circuit board type that I soldered to a mini circuit board (2 holes per pad). I screwed the board to a piece if 1/4" plywood to square and reinforce the assembly (the box cover lip touches it). The assembly was then hot-melted to the fuse body (turned 180 to provide a straight surface).
This post got me started (and may be more useful than mine).
[ comment | link | top ]
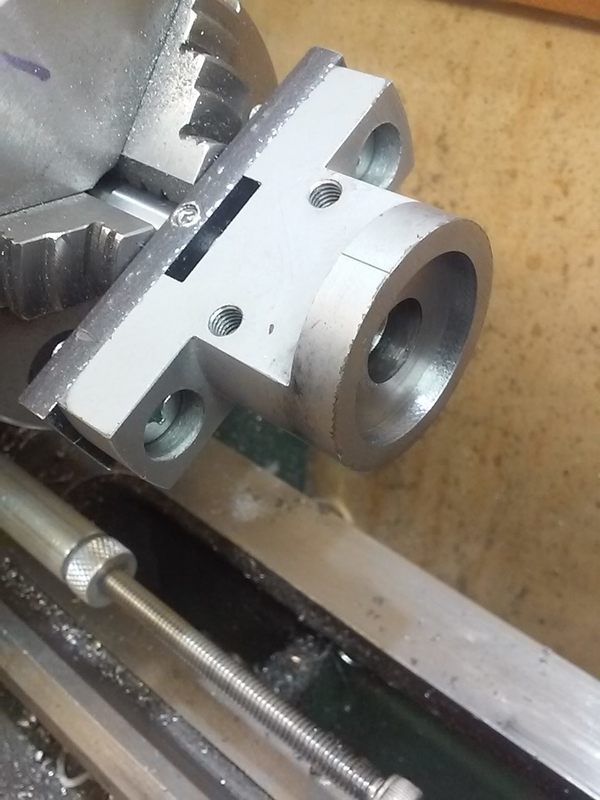
Vise Cradle
 Not the typical meaning, but I don't know what else to call it. The cradle is two pieces of 1/2" thick aluminum that register to fixed T-nuts via locating pins (the screws are optional). Once setup, the vise is easy to remove and replace so long as the T-nuts don't get in the way of another setup. The vise won't be perfectly square when reset, but the bolt/setscrew setup makes it easy to tweak the vise square. It's not clear in the image, but there are four allen head bolts that run through the aluminum. The tips of the bolts contact the vise and there are set-screws that hit the plain shank portion of the bolts. Vise squareness is adjusted by loosening/tightening opposing bolts (it doesn't take much).
[ comment | link | top ]
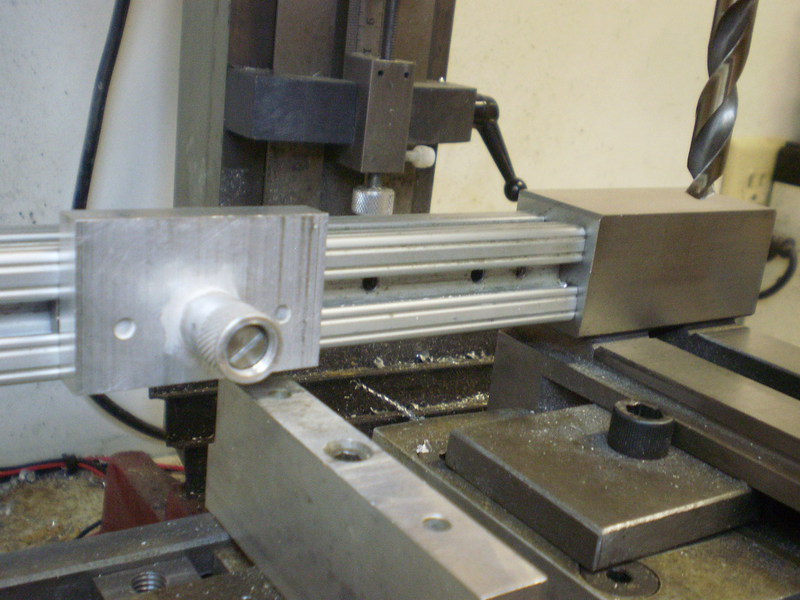
Depth Gage DROs
 I've been quite happy with my digital depth gage DRO's. I originally had a 6" one on the front, but it was too limiting. It seems there are numerous versions and I was lucky to get an 8" one that was small enough. I have since cut off the bottom arm. The location is such that inadvertently hitting the arm hasn't been a problem. The side DRO is always out of the way and relatively easy to read. All my mounts are friction/wedge fit shoulder screws.
[ comment | link | top ]
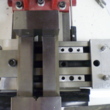
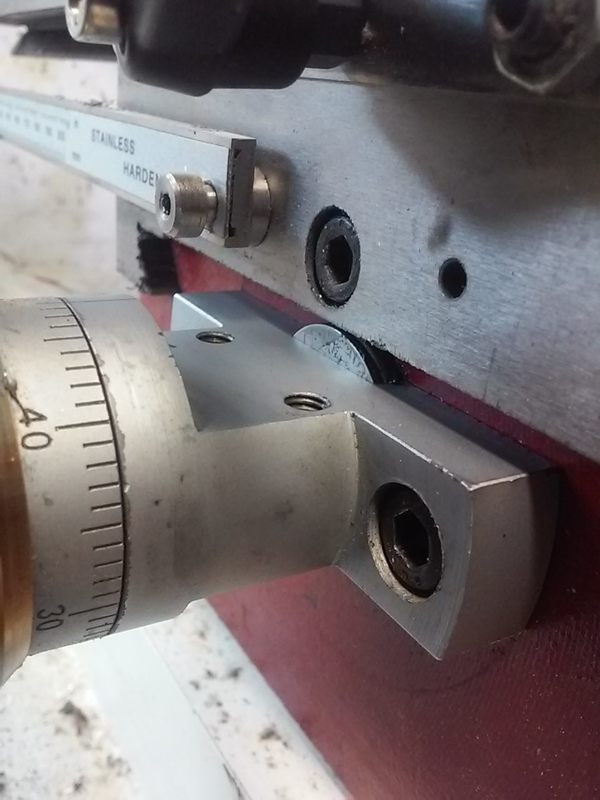
Squaring Tool
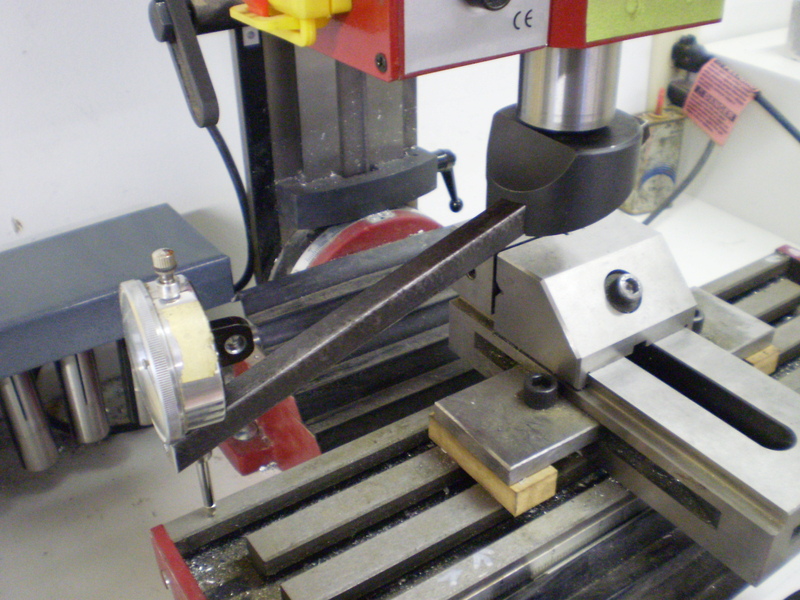 Enco used to have a really good price on their five piece fly-cutter set. I'd never use the big one on the mini mill, but it has worked out real well for squaring up the machine and vise. I used scrap 1/2" square steel and drilled/milled/taped it to hold a dial indicator at 90 degrees. One end holds the indicator square to the table. When the post is square parallel to the table (R/L), the dial indicator reading will be the same when the arbor is rotated back and forth 180 degrees. Rotating the indicator from the front to back of the table will read the same if the post is square perpendicular to the table (F/B)... Apparently this is called tramming (trammed/in tram), "to adjust, align, or measure with a trammel"*.
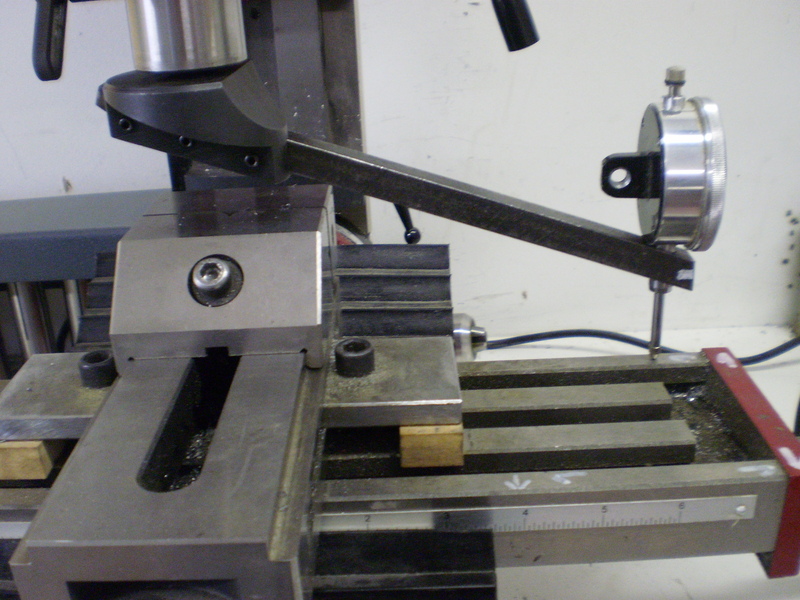
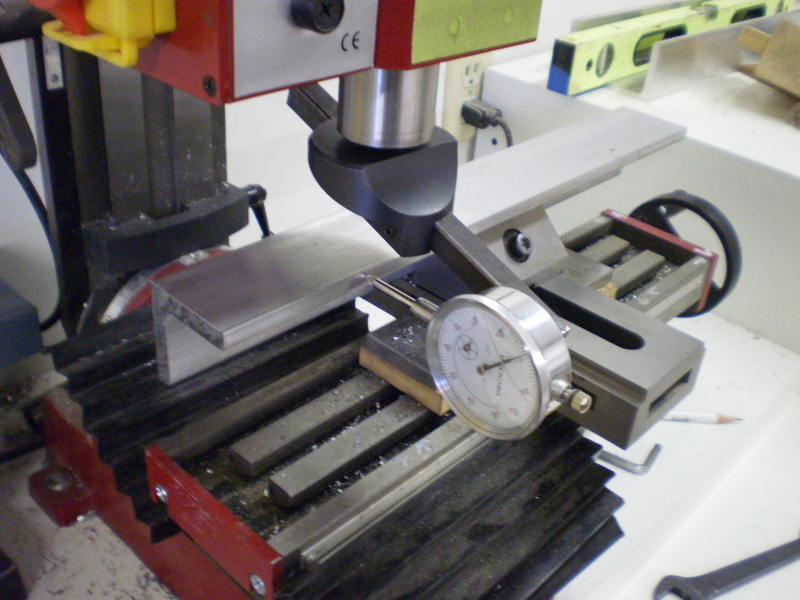 The other end of the 1/2" steel holds the dial indicator square to the rear vise face. Using a pin to lock the arbor in place, and a straight piece of angle, squaring the vice to the table is relatively easy (much easier with the Vise Cradle). Move the table from one end to the other and then adjust the vise by splitting the difference in the readings... While the heavy angle I used to use was nice and straight (now gone), I think that running the dial indicator across the back face of the vise itself (even if its relatively small) may be just as accurate.
[ comment | link | top ]